HyFlex Teaching Tips – Quick Technology Checklist

A few things to keep in mind when teaching using the HyFlex Media cart

Lesley Account and Login Credentials

Before everything else, you need to remember your Lesley username/password and have your multi-factor authentication device accessible.

HyFlex Cart

  • Whenever possible, reboot the HyFlex Media Cart in the classroom.
    • If the HyFlex Media Cart is already off when you enter your classroom, just turn it on and you should be good to go.
    • If the HyFlex Media Cart is on and logged in when you enter your classroom, please restart it following the directions (pdf).
  • When your class is over, please remember to shut down the HyFlex Media Cart before leaving.
  • You can move the cart, but it is limited to the tether attached to the cart.
    • Be careful to avoid rolling over any wires and cables.
    • The cart is heavy, please take care not to harm yourself or others.

Personal Computer/Laptop

  • If possible, reboot your personal computer/laptop before starting your teaching session.
    • There are many benefits of restarting your computer and sometimes, that is all it needs to take to fix many issues, for example, connectivity, memory, and other performance issues.
  • Connect to Lesley’s primary wireless network, Eduroam.
  • If you join the Zoom meeting from your personal computer, in addition to the HyFlex Cart, please remember to mute your microphone and silence your computer’s audio.

Online Meeting Space

  • Encourage everyone to test their microphone, web camera and speakers prior to or at the start of every virtual session.
    • If you’re able to, try to set up your classroom a few minutes early.
    • Remember to think about your background in the video. If you or your students are not in an environment that can be shared, try using a virtual background.
    • Remind your students to not sit directly in front, behind, or below a bright light source. Experiment with moving lamps and the camera until you can see your face brightly lit on screen. Covering a bright window or moving to another location may help.
  • Try to have your students attend your class meetings in a quiet, indoor location to control ambient noise.
    • If they’re unable to attend from a quiet location, ask them to mute microphone before joining the class meeting. You will be able to ask them to unmute when they need to speak.
    • If possible, have your students use a headset with headphones and a microphone for best quality audio.

Invite a Guest Speaker into Your Classroom Via a Web Meeting

Would you like to invite a guest speaker to come talk to your face-to-face class? Maybe your guest speaker lives in another city or another state or even another country. Not to worry – you can invite them to speak to your class remotely using Blackboard Collaborate Ultra!

Collaborate Ultra is integrated into your myLesley course. But your guest speaker does not need to be enrolled in your course in order to join the session. Instead, you will create a session (or use your existing course room) and send them a guest link. At the appointed time, your guest speaker will click on the link and join your session. You can project your session using your laptop and the existing classroom technology. Your guest speaker will be up on the screen and able to interact with your class.

Sounds great! How do I begin?

Before you begin, check the the Blackboard Collaborate Ultra system Requirements and Accessibility to make sure that your system is compatible. For the best experience, use the Chrome browser.

Once you have determined that you are using a supported browser and your system is compatible, either create a new Collaborate Ultra session or use your existing Collaborate Course Room.

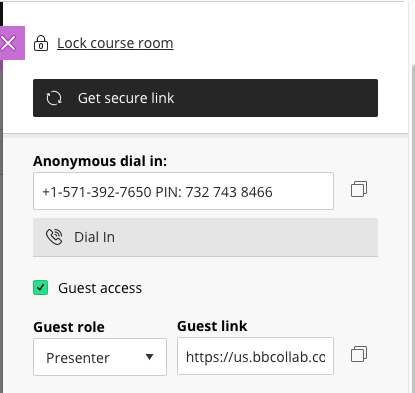
Once your session has been created (or you decide to use your existing Course Room), click on your session to open the settings.

  • Check the box to allow guest access,
  • change the guest role to presenter or moderator, and
  • copy the guest link.
Collaborate Ultra session information detailing guest access information
Collaborate Ultra session information

Paste the guest link into an email and send the email to your guest speaker. You should also include a link to the Blackboard Collaborate Ultra system Requirements and Accessibility. This will help your guest speaker make sure that their system is compatible. If your guest speaker has never used Collaborate Ultra before, send along Conducting Your Collaborate Ultra Sessionto help them familiarize themselves with the tool.

Do I need any special equipment?

For the most part, the technology available in your classroom should be sufficient. We recommend connecting to the wired Lesley network via the ethernet cable in your classroom. This will make for a smoother experience.

If you plan to have a Q&A session you may want to reserve the ClearOne Chat 160 microphone. You can reserve this equipment online using WebCheckout. If you do not need or want the microphone you can simply have your students ask questions and you can repeat the questions to the guest speaker.

Does my guest speaker need any special equipment?

Your guest speaker will need a webcam, speakers, and a microphone. If they are in a quiet location, the speakers and microphone built in to their computer will suffice. If they are in a noisier location we recommend that they use a headset. There is no need for a fancy headset – the earbuds that come with most cell phones will suffice.

Your guest speaker will also want to ensure that they are using a strong internet connection. If possible, they should plug in to a wired connection. If they cannot use a wired connection they should use a strong, reliable wi-fi connection.

I’m in my classroom on the day of the session. What now?

To begin, plug your laptop into the classroom projection system. If you are connecting via VGA, be sure to also connect the audio cable. If you are using an external microphone, plug that in to your computer.

Next, plug the ethernet cable into your laptop and connect to the Lesley network. Once you are connected, navigate to myLesley and launch your Collaborate Ultra session.

Once the session launches, check your audio and video settings to make sure they are working correctly. If you are using an external microphone, make sure the microphone is selected.

How does my guest speaker join the session?

Your guest speaker will click the link you sent and join the session. Once the session launches, they should check their audio and video settings to make sure they are working correctly. If they are using an external microphone, make sure the microphone is selected.

We’re both in the session. Now what?

Once you are both in the session, your guest speaker can turn on the webcam and the microphone and begin to speak. If they are sharing any content, they can either upload a file or presentation or they may share their screen. More information may be found here: Conducting Your Collaborate Ultra Session.

The First Week of Your Online Class

If you’re new to teaching online, the first week can be a little overwhelming. It can also be hard to tell if your students are doing anything until they start posting. Below are a few tips to help you get started. You may also want to refer to our Getting Ready for a New Semester post.

  1. Gauging Student Engagement: Use the Performance Dashboard to check on student access to the course. If a student has not accessed the course in the first week, contact them immediately (by phone if necessary). It is possible that students are not using Lesley email or have neglected to link their private email to their Lesley account.
  2. Managing Discussions: Familiarize yourself with an efficient workflow for monitoring, responding to, and assessing discussions or other group activities. A common work-flow for discussion management is:
    1. Check in briefly each day to monitor activity. If students are not on-task, use the Announcements tool to guide them back on track. If private communications are necessary, use course email.
    2. Consider your role in discussions. Keep in mind that too many posts by the instructor could discourage student interaction. On the other hand, do let students know that you are monitoring the discussion, even if your presence via posting isn’t necessary.
    3. When reviewing discussions in detail, use the “Collect” tool to view all the text at one time. You also have the option to print the discussion text.
    4. Use a printout of the students’ names, along with the text of the discussion board (electronic or paper printout), to assess the quality of interaction and postings.

For additional assistance and tutorials please visit our website or contact eLIS@lesley.edu

Getting Ready for a New Semester

The Fall semester is fast approaching and there is so much to do. Below are a few reminders and tips from our instructional design team to smooth the way and get off to a great start.

Before Your Course Begins:

Personalize Your Course: Consider which aspects of the course you want to adjust.  At minimum, this should include parts of the syllabus (your contact information, for example). If necessary, contact eLIS or use our online tutorials to learn about Blackboard editing tools.

Review and update information as necessary in the syllabus that sets expectations for communication, group work, or instructor facilitation. For example, will the pre-established turn-around times for feedback work with your schedule? Keep in mind that changes you make in the syllabus might need to be checked against content you entered into myLesley to make sure the instructions align in both locations.

Set Up a Teaching Schedule: Consider setting up a teaching schedule to better organize your teaching time.  A schedule can help you to identify when to attend to different facilitation tasks (i.e. weekly announcements, daily discussion board check-ins, major project or paper feedback, etc.).

Familiarize Yourself with These Tools:
Performance Dashboard: Use this tool to quickly view if and when students are accessing the course.
performance dashboard

Announcements Tool: Recommendations for using this tool include:

  • Always make sure to send Announcements as emails. Embedded images, video, or audio will NOT be available to students in emails.
    emailannouncement
  • Use the Announcement Tool for:
    1. Welcome messages, briefly introducing yourself and the course
    2. Introducing a new week and wrapping up a previous week
    3. Providing whole-class feedback on discussions, group work, etc.
    4. Updating students on changes to the course or assignment scheduling
    5. Clarifying any confusion that multiple students have experienced

Post a Welcome Announcement: In addition to welcoming students to the course, you might point out the syllabus and other key documents to review before beginning the first module.

Taking care of these seemingly small things now can greatly help you stay organized and in contact with your students as you move through the course.

Learning Online: It’s a Process

Nancy Beardallprofile image teaches dance therapy courses for the Expressive Therapies program. This September, she taught her Body/Movement Observation and Assessment course online for the first time. To prepare for this new experience, Nancy worked with an eLIS instructional designer over several months to reimagine what her face-to-face content would look like online.

During the design process and while teaching online, Nancy had several realizations. As a dance therapist there’s an intuitive sense that informs her teaching. When teaching online, there’s also an intuitive sense to using and smoothly integrating the technology, but she didn’t have that technology vocabulary to guide her. This created a feeling of discombobulation of how the two would fit together. To overcome her obstacles, Nancy continued working through her content with an instructional designer and attended eLIS’ Summer Technology Institute, The Institute allowed her to use an inquiry model to re-examine her content with other faculty while at the same time exploring technologies and how they might ‘fit’ her content.

One of Nancy successful blendings of content and technology was the students’ final presentations. Students recorded and analyzed their application of specific movement theories. Their videos were uploaded to a course media gallery using Kaltura Video in myLesley. Nancy then scheduled synchronous online meetings in Lync. Each student had ten minutes to present their work and five minutes for follow up. Students reviewed each other’s videos in advance of the online meetings and posted feedback to the students within a few days after the meeting. Nancy found that the wait time between the presentation and the responses was an unexpected benefit. Students could review presentations at their own speed as often as they needed and they had time to think and process what they had experienced. She found their responses to be much more thoughtful as they balanced their initial reactions against longer reflections when they wrote their comments. They were simply “terrific.”

Nancy’s second realization was that she probably talked too much in her face-to-face classes. She wasn’t able to do that online. As a result was that the students did more of the talking and presenting while she listened and guided. Nancy liked the result of hearing her students as they worked through the content so much that she is now trying to shift the balance in her on-campus classes and talk less allowing her experience teaching online to inform her face-to-face teaching practice.

If Nancy had one piece of advice for faculty new to teaching online, it would be to realize that “it takes a village” to learn. You won’t be doing this by yourself. Work with the eLIS designers, other faculty and even your students to learn the design, teaching and technology skills you will need. It will be an iterative process. There will be frustrations, but there will also be successes and unexpected benefits. The final result probably won’t be what you originally envisioned. With time, patience and a willingness to adapt, it can be much better!