Faculty Experiences with Blackboard Ultra

Blackboard Ultra represents the latest iteration of the Blackboard learning management system. It has undergone a complete redesign with a focus on improved navigation, enhanced accessibility, and responsiveness across various devices. This revamped version offers several advantages over its predecessor, but it’s important to note that transitioning a course to Ultra requires more than a simple cut-and-paste process.

During the recent Spring semester, five faculty members at Lesley University taught their courses using the Blackboard Ultra Course View. These instructors covered diverse subjects at both the undergraduate and graduate levels, with one course even being self-paced to cater to K12 teachers seeking continuing education credits. The faculty members who embraced Ultra included Donna Owens, teaching Psychopathology and Clinical Practice in the Expressive Therapies department; Diana Direiter, teaching Trauma and Crisis in Psychology; Liv Cummins, teaching Comedy in Humanities; Jennine Tambio, teaching Enhancing Quality Early Childhood Programs and Transition Seminar: Lives in Context in Education and LCAL (Lives in Context and Learning) respectively; and Cindy Downend, teaching Comprehensive Phonics in Reading Recovery.

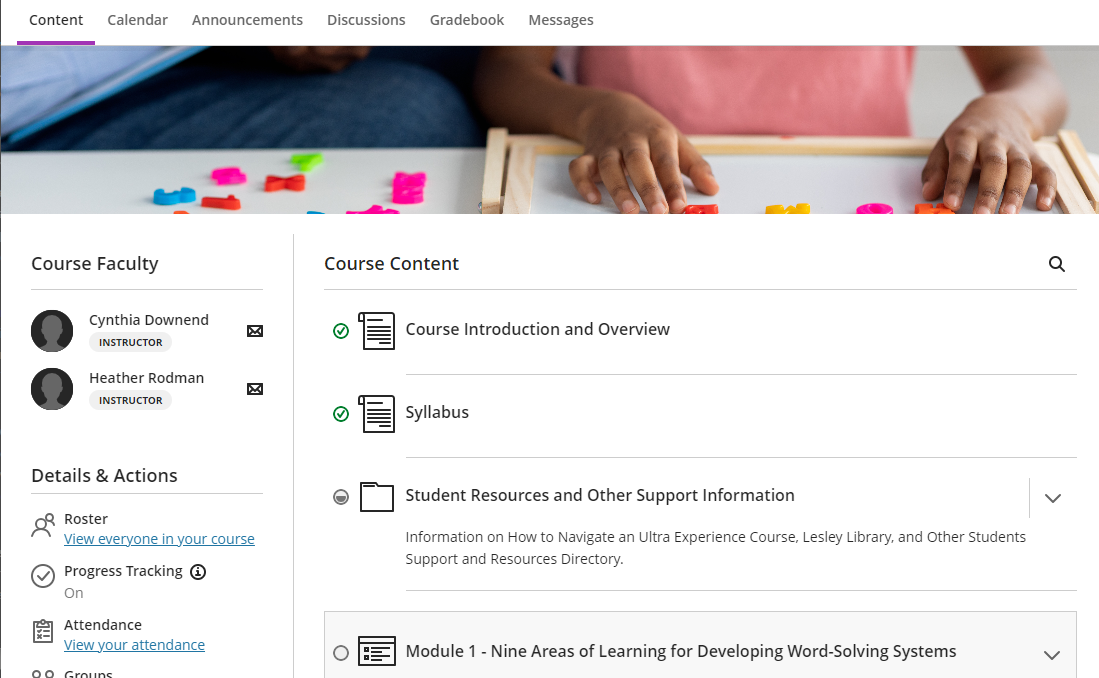
The Ultra instructors found the new format to be intuitive and user-friendly, requiring very little support during the transition. For instance, Donna Owens, who taught Psychopathology and Clinical Practice, appreciated the redesigned learning modules, which made it easier for her to share content and for students to understand course requirements. The progress tracking feature helped students stay on track throughout the course.

“From an instructor viewpoint it made everything smoother.”

Cindy Downend, who taught Comprehensive Phonics, only needed a brief orientation on uploading content. She also received assistance in setting up release conditions on modules, allowing students to unlock content based on their assessment performance. Jennine Tambio, who taught two Ultra courses, expressed her enthusiasm for the Ultra rubrics, finding them easy to create and grade with. This was a significant improvement compared to her experience with the Original version of Blackboard.

Overall, students responded positively to the Ultra experience. They found the course navigation, participation in discussions, and assignment submission to be easy and straightforward. While some students initially resisted the change, providing tutorials or course tours helped alleviate their concerns. Donna Owens noticed that her students were actively using the Ultra Course View during in-class activities, which eliminated the need for printing or online searching.

“It is very organized and easy to use.”

“It was a pretty easy switch”

“looks better, and is more clear and easy to access.”

Based on their experiences, the faculty members offered some advice to colleagues considering the switch to Ultra. They recommended spending time familiarizing oneself with the platform, utilizing the student preview feature, and providing tutorials for students who are new to Ultra. Diana suggested thinking creatively to achieve teaching goals, while Cindy emphasized reaching out to eLIS for any questions or support needed.

For those interested in adopting Blackboard Ultra, contact eLIS at eLIS@lesley.edu to schedule an appointment. eLIS offers course reviews, training, and guidance to assist in the transition to Ultra.

Organizing a Week of Teaching

Link to a Word Document with a Module Template Creation Guide.

When you design your course, we recommend that your content be “chunked” into discrete, manageable units of learning. Whatever you decide to call it – a module, session, unit, or section, the most important thing to remember is to present materials to your students in a meaningful and helpful way. Treat it as a “learning guide” to help students make connections with what they are studying to their future endeavors by writing narrative pieces that include important and worthwhile instructions/ references.

One way to do this is to follow a weekly format that aims for each weeks’ layout to be similar, and predictable. A recommended format for a week is to provide the following:

Teaching Notes

This is a private section to leave notes for yourself (or other instructors) to guide you through facilitating the specific week. It can range from reminders to make a special announcement for an assignment that is outside a regularly scheduled deadline to a script with PPT slides to make a needed video or lecture presentation. While this section will not be seen by the students, we consider it important to include this section to help you keep track of facilitating notes and potential pitfalls to avoid.

Overview

The Overview section begins with a 1-2 short paragraph narrative, which provides the context or “glue” for the module’s content and learning activities. Speak directly to the students and include information that frames the content in your voice and with your perspective on the content. Include any critical information that may have been traditionally delivered orally in the face-to-face classroom. This might include illustrative stories or examples, challenges students may encounter with key concepts, typical misconceptions, an overview of the module’s activities, and so on.  If this section becomes too lengthy, you might also elect to include specific portions within the context of the rest of the module sections.

Weekly Learning Outcomes/Objectives

Unit-level objectives that describe what students should be able to do by the end of this specific week.

After completion of this week’s activities, you should be able to:

  • Identify….
  • Analyze…
  • Please refer to the Bloom’s taxonomy list for other learning verbs.

These weekly objectives should draw a clear connecting line to the overall course learning outcomes.

Required (& Recommended) Readings and Resources

Elaborate on the information provided in the Syllabus by explaining why, how, and in what order students should work through the resource materials. For example, if you include a YouTube video as a course resource, briefly explain your rationale for selecting that particular video, information students should pay close attention, etc.

Instructional Materials

This section can be excluded if all your instructional materials for the week is in the Readings and Resources section. If you want to call special attention to something specific, you can have it here as a separate section. In a typical synchronous delivery modality, your content may be given as an interactive lecture, balancing passive and active learning. HyFlex and Hybrid courses include both online and in-class delivery simultaneously, strategies for content delivery will necessarily incorporate various educational frameworks and technologies. One strategy is taking the Flipped Classroom approach. Do not simply repeat the information students already encountered in the readings and resources. Focus on:

  • Expanding their understanding by providing important background information
  • Clarifying important concepts by explaining them in a new way
  • Connecting new information to previously learned concepts
  • Providing real-life examples
  • Prompting students to connect content with their lived experiences

Learning Activities/Assignments

This section provides students with opportunities to interact with content, peers, and the instructor. Now that students have worked through the reference and instructional materials, what will they DO? Activities should be relevant, preparing students for success in their evaluated coursework and in their future professions. Activities may be completed by individuals, small groups, or the entire class. They may include personal reflection, class discussion, concept mapping, case study, simulation, educational games, interviews, as well as evaluated course components such as assignments and quizzes.

This section should be used for anything that is graded. The format for assignment activities you choose to implement in your course should be consistent so that students do not get confused. This consistency will allow students to focus on the content and activities rather than the format or the need to search for extra details.  For each learning activity/assignment, you will need to provide clear instruction for interactivity, submission, and criteria for assessment. This may be stated in your syllabus, but it is good practice to repeat details here.

See the following example for a discussion activity.

Activity Type (Discussion): (Include a descriptive name for activity)

Use the space to describe activity/assignment. This includes:

  • Context for assignment and how assignment relates to reading, other course activities, and/or objective(s).
  • Details about how to perform the assignment
  • Link or reference to assessment criteria or rubric
  • Information about where to submit and if and how to respond to classmates
  • When the assignment is due.

Include due dates. for example, for a discussion activity, you will want to provide:

  • Post your initial thoughts to the discussion board by day of week at Noon.
  • Respond to at least two of your peers by some other day later in the week at Noon.

Provide a rubric or assessment details:

  • This activity will be graded out X points, following this breakdown….

Repeat instruction set for as many activities/assignments you plan for the week.

Checklist for the Week

Provide a list summarizing the important due dates for the week. For example,

  • Post-initial thoughts to the discussion by Thursday
  • Post your field observation to the blog by Thursday
  • Post responses to at least two of your colleagues’ discussion posts by Sunday
  • Post comments on at least two of your classmates’ blog post by Sunday.

Link to a Word Document with a Module Template Creation Guide.

Piloting Blackboard Ultra

Jennine Tambio teaches the Research Capstone course for the College of Liberal Arts & Sciences (CLAS) at Lesley University. In this fully online course, students develop a senior research project based on an area of interest in their major. They synthesize the knowledge and experiences they have gained from prior courses through research, discussion, peer review, and reflection.

This summer, Jennine taught her SU1 and SU2 courses in Ultra Course View. Ultra is Blackboard’s newest version, redesigned from the ground up. It has several advantages including a more modern look, consistent navigation, progress tracking for students, streamlined grading, and more.

eLearning and Instruction Support (eLIS) at Lesley approached Jennine about piloting Ultra courses due to her heavy use of peer review. Previously, she had been using an external tool called PeerGrade which provided a robust framework for students reviewing each other’s work using rubrics. While Jennine liked PeerGrade, it required purchasing a subscription and the company was beginning to phase out its use in favor of a newer product. The Ultra Course View includes the option for peer review directly in its assignment tool. No additional tools required. Jennine also thought it looked cleaner and easier to use.

To get started, eLIS set up and transitioned the first few weeks of the course. Jennine quickly took over creating the subsequent weeks with guidance from eLIS. She had a couple of minor questions that were quickly answered while learning the new environment, but nothing significant. As part of the transition, she consulted with eLIS on how to reorganize parts of her course to make it concise and easier to navigate. She also worked to turn the narrated Powerpoints she had previously created into Kaltura videos making them more accessible for her students and captioned.

The resulting Ultra courses were very successful. Jennine got a lot of compliments from her students who “thought I had just made a beautiful Blackboard course.” Her students “were all able to hop in and seamlessly navigate” the course.

“It’s much cleaner, fosters more collaboration because of the format. The peer review feature was really cool and I loved that part of the course.”

“I enjoyed how easy it was to see what was due each week and to check them off!”

“I like Ultra Course mode much better.”

– Student survey responses

The process of transitioning her course helped her to “improve the quality and delivery of the course.” The peer review tools in Ultra were easy to use and allowed her to see each student’s submission, their feedback to others, and the self-review of their own paper all in one space. The students didn’t need to navigate to another site and learn another tool. And Jennine didn’t need to pay for a subscription.

According to Jennine, “It’s not a stressful transition.” While recreating her course took a little time, she appreciated the opportunity to rethink, update, and finetune certain aspects of her course. She found the final result more visually appealing. Her students were very engaged and she discovered helpful tools and nuances for a better teaching experience.

Interested in learning more about the Ultra Course View and if it is right for you? Contact elis@lelsey.edu.

A Frequently Made Support Request

The eLIS support channel often receives requests for Blackboard/MyLesley orientation. Here’s what I focus on in that first walk-through with a new instructor:

First, I talk them through creating a welcome message to their students using Announcements. It’s the first thing students will see when they come to a course site by default. It’s also a good opportunity to introduce the Content Editor and the functionality available there.

Second, I show them how to upload their syllabus into their course. This allows me to show a couple of different ways to attach a file to a content item, either via the attachment feature in the text editor or via the “attach file” tool below it.Blackboard Content Editor highlighting Plus tool

I point them to the circle-plus icon in the text editor, because of the added functionality there, such as Kaltura and Voice Thread. I don’t go into too much detail about either of those two items— it feels like too much information for a first walk-through, and one can always come back later for more info.

Add Content menu in Content Editor

The third area I touch upon is the Assignment tool, because it’s the perfect entrée into the Grade Center, which is the final thing I spend time on. The assignment tool creates a column in the grade center automatically. I can then show them how to create manual columns. New instructors often ask how their students can see their grades, which allows me to point to the My Grades tool, and therefore Student Preview, which allows instructors to see what’s in My Grades, among other things.

I wrap up by saying, “There’s a lot more to show you, and if you’d like we can make an appointment to go into more detail, or you can ask questions via email at elis@lesley.edu.”


Check For, and Fix! Broken Links in Your Course

What can you do to prevent students clicking on links for required readings in your course and discovering that materials they are responsible for are missing? Links in new courses break for various reasons. It could be that the course copy process itself has somehow broken some links, though this is rare. It’s more common (and understandable) that pages linked to in your course have either been taken down or simply changed location on a revised site.

It’s good practice to proactively go through your course right after it’s been copied over and click on each link to make sure that they all work. Even if your course has a lot of links, the simple act of clicking on all of the links should not take too long. The part of the process that may take longer, depending on what you find, is fixing each link that doesn’t lead where it’s intended to.

The next step is to find the addresses for the materials you want to use when you rebuild the links. Start with searching the site for the information you’re looking for; most ed sites will have a search function. If you find that the information you want to pass along is either revised enough to no longer be useful or missing from the site altogether, you may need to find an alternative if the information is vital for your students. (Hint: you might use Lesley’s Ask a Librarian service for assistance with this.)

Once you have the new link in hand, saved to a word document or opened in a separate tab in your browser, you’ll need to build a new link, and then delete the old one. I recommend deleting the old link after building the new one, because it’s easier to see where the new link should go and should make it easier to identify and make any revisions in the language in your text in order to accommodate the change.

Here’s how to create the new link using Blackboard’s text editor, adapted for this post from our knowledge base article at support.lesley.edu:

Adding Links

When pasting links to websites such as YouTube and Vimeo, the videos are automatically embedded for inline playback. Simply paste the link in the content editor and Blackboard will automatically embed the video.image of the Blackboard content editor with an image added.

Other links, such as those to other websites, may display a preview of that page.image of the Blackboard content editor with preview of a linked page.

To ensure the links you create are accessible, your language should convey clear and accurate information about the link’s destination. For example, instead of adding a link to the text “Click here”, include the full title of the destination page, such as “Microsoft Office Support Resources.”

To create a link, click on the Insert/Edit Link button in the content editor (it’s the one in the second row that looks like two links in a chain.) You will be prompted to enter the URL (you may copy and paste the link from your browser or the word document mentioned above), the text to display (the descriptive word or phrase you want to use as your link), and select “Open link in… New window.”image of the Blackboard insert/edit link window.This last bit is important; Blackboard/MyLesley works better if you set the link to open in a new window. Clicking a link that is not created in this way will send you to an intermediate page warning you that you are about to leave your course site, which can be confusing. Using a new window will also help your students navigate back and forth between the content you are linking to and the course itself with a single click on a browser tab.

For more information about other aspects of working with the new text editor, view Using the myLesley Text/Content Editor on our support site.