Comparing Lesley’s Online Meeting Tools

Microsoft Teams, Zoom, and Collaborate Ultra are all great online meeting tools. They simply do the job in slightly different ways. The one that’s right for you depends on your task, your preferences, and your attendees.

Scheduling Meetings

It’s fairly easy to schedule a basic meeting in all three tools.

Creating a meeting in Teams is very similar to creating on in Outlook. Enter a meeting title, the date and time, the names of the attendees, and click Save. Your meeting will be created and your attendees invited.Calendar invite Teams

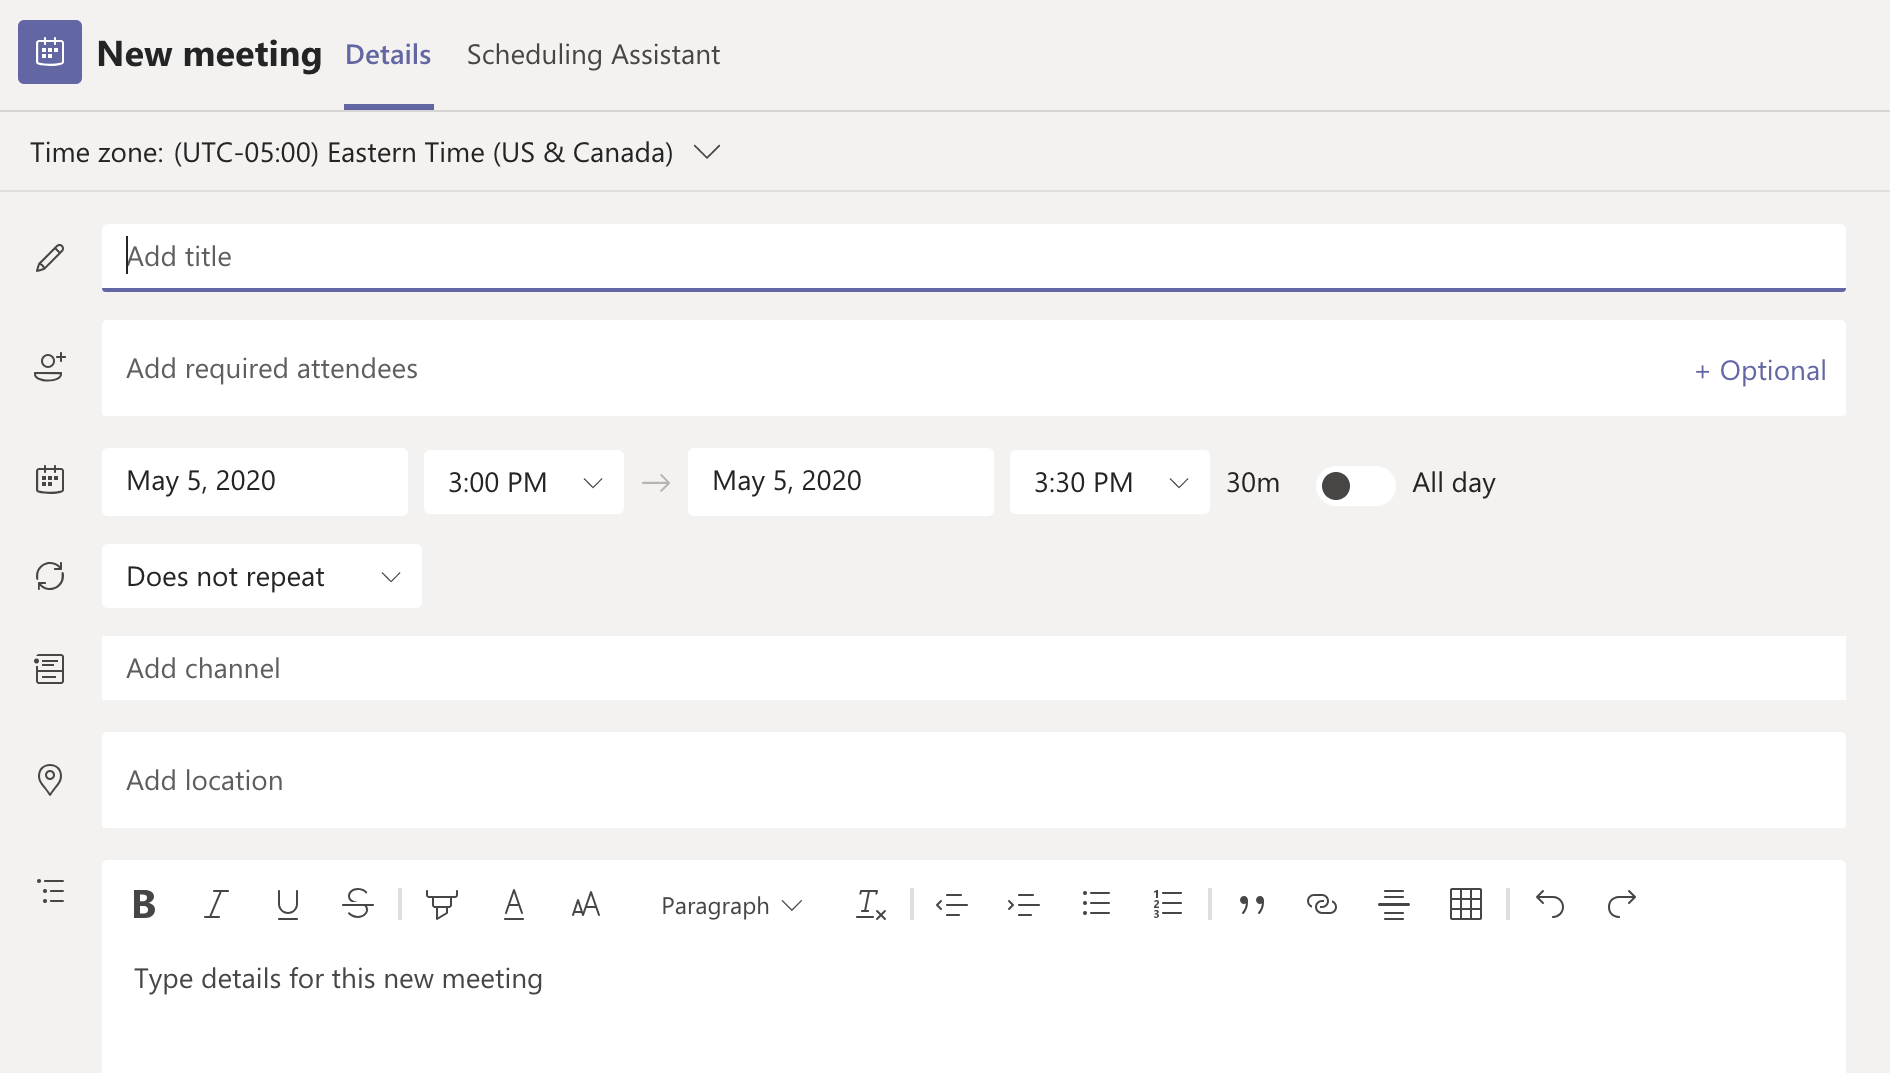
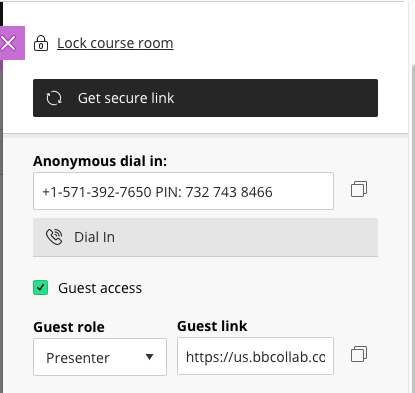
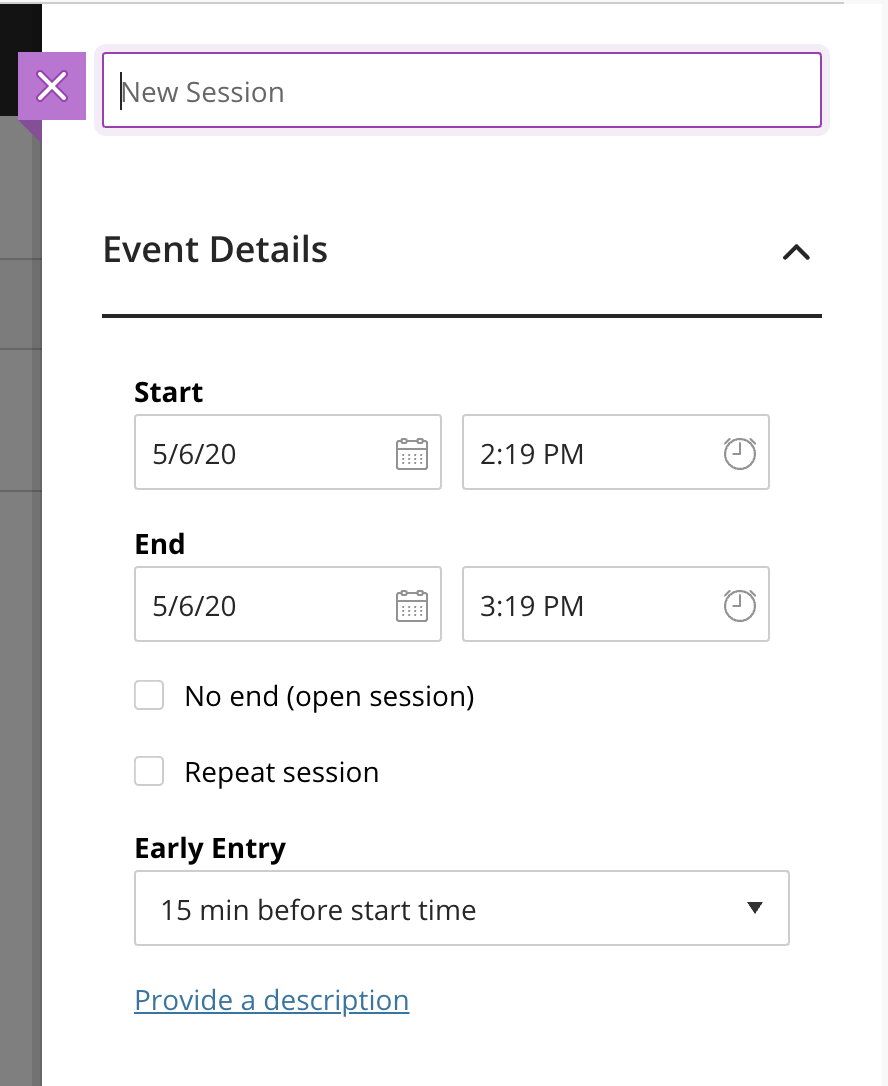
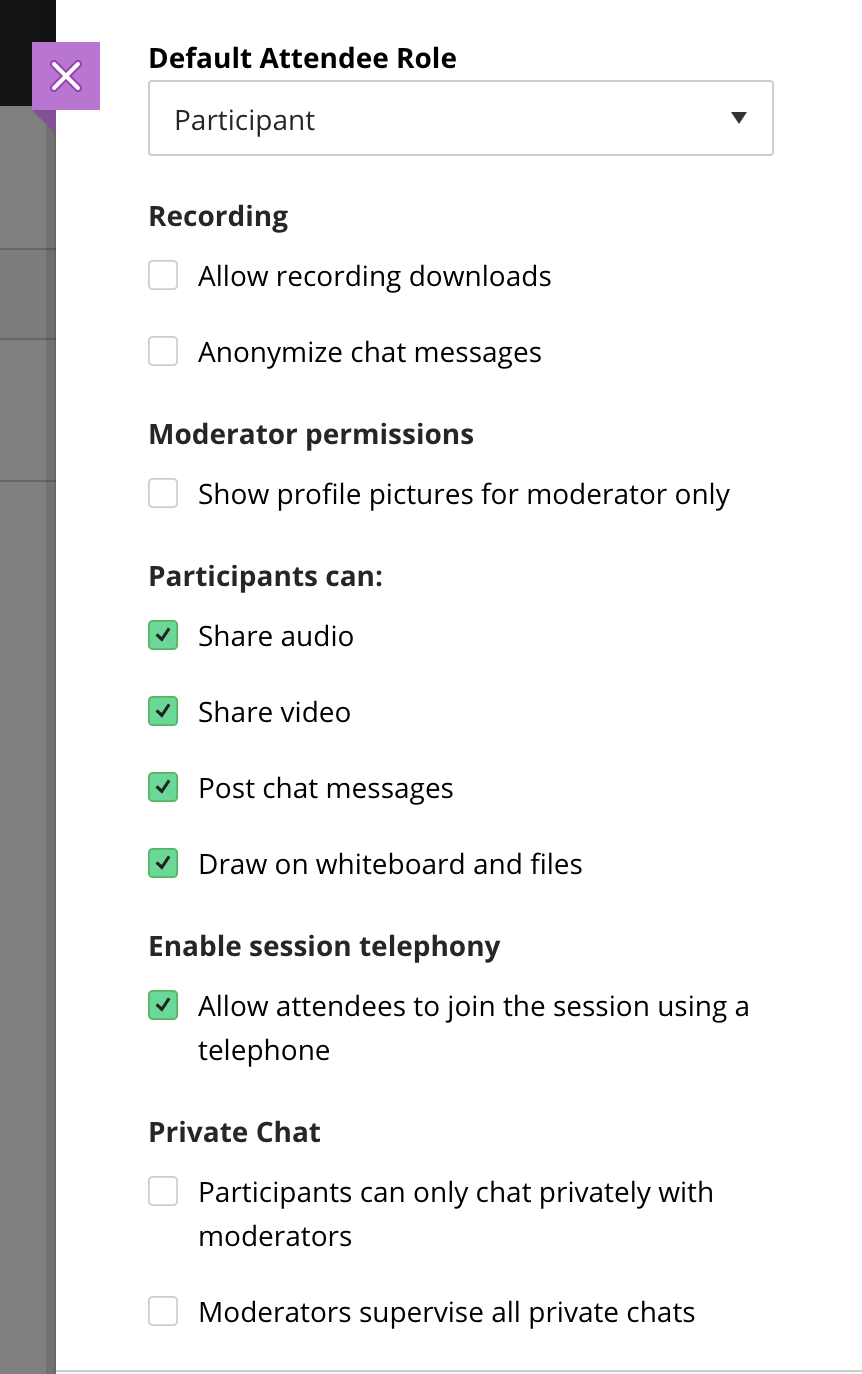
To create a meeting in Collaborate Ultra, navigate to your myLesley/Blackboard course and use the Collaborate Ultra scheduler to enter the name, date, and time for your meeting. Optionally, you may set controls for what tools you attendees can use during the meeting. Your students will be able to access the meeting from your class site or you can copy the guest link for the meeting and send it to anyone you wish to join including outside guest speakers.
Create Collaborate Ultra meetingmeeting options for Collaborate Ultra

Zoom meetings are created using the Zoom application or web portal although you can optionally use add-ons for Outlook. Simply click Schedule a New Meeting, enter your meeting name, date, time, and duration and click Save. You can choose meeting options such as requiring a password or enabling a waiting room for security.

Once your meeting is created, copy the invite and email it to your attendees or share the link in your myLesley/Blackboard course.


Meeting Online

All three options are solid online meeting tools. Which one is right for you depends on what you need to do.

Looking for the most webcams: Zoom
If you are looking to have a meeting where you can see everyone’s face and have a discussion, Zoom is the way to go. Zoom can potentially display up to 49 participants. However, that number is dependent on your computer hardware and you will likely need to scroll to see everyone. That said, if your meeting has 20 people or less you should be able to see their face using the gallery view.

Teams will currently display four people, although that number is supposed to go up to nine very soon. Collaborate Ultra will display four people when using Chrome and two when using Firefox. However, that number is expected to increase to around 30 later this year.

Collaboration around projects: Teams
Teams is not just an online meeting tool. It also has individual and group text chat, document sharing and collaboration using OneDrive. You could organize a whole project in Teams (and I have). Create a team for your class. Then create channels, or topics, for discussion and collaboration. The great thing about Teams is that you can use it synchronously and asynchronously allowing you to meet as needed, but keep working together in between meetings… all in the same place.

Traditional virtual classroom: Collaborate Ultra
Collaborate Ultra was built for educators to have class online. Therefore, it has participant management tools for allowing (or not) video, chat, and screen sharing. If you want present a Powerpoint or PDF to your online class in a way that won’t use up all the internet bandwidth, Collaborate is the one to choose. You can do all of these things in Zoom now, too. The main difference is that Zoom started out as a meeting tool and has been adding in participant controls and security. Collaborate Ultra began as a virtual classroom and has been adding in ease-of-use meeting features.

Breakout groups: Collaborate Ultra or Zoom
Both Collaborate Ultra and Zoom will allow you to create breakout groups on the fly for small group discussions during your meeting. Participants can use their mics, video, screen share and use the whiteboard. Zoom’s communication tools to the breakout groups is currently a little better while Collaborate Ultra is integrated into the Groups tool in Blackboard. This would allow each group to use Collaborate Ultra whenever they needed.


Integrations

Collaborate Ultra is fully integrated into Blackboard. You can use the always available Course Room, schedule additional sessions as needed, view recordings, track attendance, and allow students doing groupwork to have their own Collaborate Ultra session within the Groups tool.

Zoom is integrated into Blackboard with almost all the same capabilities. It won’t integrate into other Blackboard tools the way Collaborate Ultra does, but you are able to schedule meetings, watch recordings and track attendance. Zoom also has a marketplace of apps you can integrate to make Zoom even more useful. Currently approved apps include Teams, OneDrive, Google Drive, Dropbox, and Calendly. Please note: Marketplace apps must be approved for use by Lesley.

Teams also has a long list of apps you can integrate, but most of them won’t be useful unless you are using all of Teams capabilities, not just meeting online.


Security

Zoom began as a meeting tool that was easy to use and access. The downside of that ease of use is it has been less secure than other tools. However, there are ways to make your Zoom meeting more secure. Do not post the link to your meeting publicly. Set a password for the meeting for extra security. Use the Waiting Room feature and then admit each person as they arrive. Only the people you admit will be able to access the meeting. Or create your meeting in your Blackboard course and ask students to access it there.

Collaborate Ultra is available in your Blackboard course. Online meetings created in your course can only be accessed by students and faculty with access to that course. However, if you broadly share the guest link to your meeting or post if publicly, anyone with that guest link will have access to that meeting. Moderators may remove any uninvited guests.

For Teams meetings, you will invite each person to your meeting as you would when creating an Outlook calendar invite. Those invitees could forward the invite to others, but they will be placed in a waiting lobby until you allow them to join the meeting.


Extras

Real-time captions – Teams
Currently Teams is the only meeting tool that has live machine captions. Unfortunately, not everyone has it as it’s still in beta, but it should be rolling out to everyone soon. Both Zoom and Collaborate Ultra allow you to assign someone to act as a captioner. This person can then type in the captions and anyone who needs them can view in real time.

If you are using an ASL interpreter, both Zoom and Teams will allow your attendees to pin the interpreter’s video on the screen so it is always visible.

Captioned recordings – Zoom and Teams
Both Zoom and Teams will automatically caption your recordings using machine AI. This option is still not available for Collaborate Ultra, but it is expected soon. All three tools will allow you to download a video of your recording. This video can be uploaded to Kaltura in your Blackboard course. Kaltura will automatically caption the video.

Polls – Collaborate Ultra and Zoom
Both Collaborate Ultra and Zoom will allow you to create and share a poll during your online meeting, but they do it a little differently. Zoom requires that you create your poll in the Zoom web portal. This means that only hosts can create a poll, although co-hosts have the ability to launch it. Polls in Collaborate Ultra are created within the meeting and can be done by any moderator or presenter. However, polls are much simpler in Collaborate Ultra. You simply choose the number of multiple choice options and then either state the question or have it on a presentation slide. In Zoom, the question can be included with the multiple choice options.

Attendance – Collaborate Ultra
Collaborate Ultra has a slight edge if you wish to track attendance. Both Collaborate Ultra and Zoom will allow you to view a report of who attended your meeting. However, Collaborate Ultra will also allow you to send that information to your Blackboard courses Attendance tool allowing you to take attendance for all of your meetings in one place. An attendance grade will appear in the Grade Center for you to optionally include in your overall grade calculations.


View Online Meeting Skills and Tutorials to find out more about using each of these tools.


Communicate With Your Students

Keep communications flowing even when you’re not in the classroom. Communicate in real time or whenever it’s convenient for each person.

As you consider your options, check with your students about their access to technology. Do they have access to a computer at home or do they only have a mobile device (tablet or mobile phone)? Do they have fast, reliable internet at home or are they on a slower connection or data plan? This information will help you as you plan for which tools and workflows will work best for your course.

Synchronous Communication

Synchronous communication methods allow you to communicate with your students in real time. This type of communication is great in order to give your students information, answer questions, conduct online office hours, or hold a virtual meeting.

Please note that some methods of synchronous communication will require a strong internet connection. If your students do not have access to fast, reliable internet, then you may wish to use a low tech or asynchronous option.

  • Phone: Communicate with your students one-on-one with a simple phone call. If you want to speak with multiple students at once, set up a conference call using a free tool like FreeConferenceCall. This is a great low tech way of ensuring that everyone is able to participate.
  • Instant Messaging or Video Chat: Use instant messaging or video chat to communicate one-on-one or in small groups using a tool such as Microsoft Teams. Please note that Teams will require you and your students to install the Teams app. If you will be sharing video, you and your students will need a strong, reliable internet connection. Download the Teams mobile app to stay in touch from wherever and whenever you need to.
  • Online Meeting or Webinar: Create an online meeting or webinar using Microsoft Teams or Blackboard Collaborate Ultra to conduct live meetings, present information, or share your screen. If you will be sharing video or your screen, you and your students will need a strong, reliable internet connection.

Asynchronous Communication

Asynchronous communication methods allow you to communicate with your students when it’s convenient. You and your students may read and respond within a few minutes or a few days. When using this type of communication method, let your students know your expectations for responding. Is there a deadline? Do you expect a response within a few hours or within a few days?

Help and Resources

Online Tutorials 

The IT/eLIS Support Site provides resources and tutorials for all Lesley-supported technology, including myLesley, Kaltura Media, VoiceThread, Collaborate Ultra, Microsoft Teams, and more. Not finding what you’re looking for? Put in a support ticket for more information or to set up a training. 
 
Hoonuit (formerly Atomic Learning) features hundreds of self-paced video tutorials for popular software, online tools, tech integration, and more. Log in to Hoonuit with your myLesley username and password. 

Request a training 

Do you have questions or don’t know where to start? Reach out to eLIS and set up an appointment to learn more. eLIS staff are available to meet with you in person in University Hall, online, or on the phone. 
 

Invite a Guest Speaker into Your Classroom Via a Web Meeting

Would you like to invite a guest speaker to come talk to your face-to-face class? Maybe your guest speaker lives in another city or another state or even another country. Not to worry – you can invite them to speak to your class remotely using Blackboard Collaborate Ultra!

Collaborate Ultra is integrated into your myLesley course. But your guest speaker does not need to be enrolled in your course in order to join the session. Instead, you will create a session (or use your existing course room) and send them a guest link. At the appointed time, your guest speaker will click on the link and join your session. You can project your session using your laptop and the existing classroom technology. Your guest speaker will be up on the screen and able to interact with your class.

Sounds great! How do I begin?

Before you begin, check the the Blackboard Collaborate Ultra system Requirements and Accessibility to make sure that your system is compatible. For the best experience, use the Chrome browser.

Once you have determined that you are using a supported browser and your system is compatible, either create a new Collaborate Ultra session or use your existing Collaborate Course Room.

Once your session has been created (or you decide to use your existing Course Room), click on your session to open the settings.

  • Check the box to allow guest access,
  • change the guest role to presenter or moderator, and
  • copy the guest link.
Collaborate Ultra session information detailing guest access information
Collaborate Ultra session information

Paste the guest link into an email and send the email to your guest speaker. You should also include a link to the Blackboard Collaborate Ultra system Requirements and Accessibility. This will help your guest speaker make sure that their system is compatible. If your guest speaker has never used Collaborate Ultra before, send along Conducting Your Collaborate Ultra Sessionto help them familiarize themselves with the tool.

Do I need any special equipment?

For the most part, the technology available in your classroom should be sufficient. We recommend connecting to the wired Lesley network via the ethernet cable in your classroom. This will make for a smoother experience.

If you plan to have a Q&A session you may want to reserve the ClearOne Chat 160 microphone. You can reserve this equipment online using WebCheckout. If you do not need or want the microphone you can simply have your students ask questions and you can repeat the questions to the guest speaker.

Does my guest speaker need any special equipment?

Your guest speaker will need a webcam, speakers, and a microphone. If they are in a quiet location, the speakers and microphone built in to their computer will suffice. If they are in a noisier location we recommend that they use a headset. There is no need for a fancy headset – the earbuds that come with most cell phones will suffice.

Your guest speaker will also want to ensure that they are using a strong internet connection. If possible, they should plug in to a wired connection. If they cannot use a wired connection they should use a strong, reliable wi-fi connection.

I’m in my classroom on the day of the session. What now?

To begin, plug your laptop into the classroom projection system. If you are connecting via VGA, be sure to also connect the audio cable. If you are using an external microphone, plug that in to your computer.

Next, plug the ethernet cable into your laptop and connect to the Lesley network. Once you are connected, navigate to myLesley and launch your Collaborate Ultra session.

Once the session launches, check your audio and video settings to make sure they are working correctly. If you are using an external microphone, make sure the microphone is selected.

How does my guest speaker join the session?

Your guest speaker will click the link you sent and join the session. Once the session launches, they should check their audio and video settings to make sure they are working correctly. If they are using an external microphone, make sure the microphone is selected.

We’re both in the session. Now what?

Once you are both in the session, your guest speaker can turn on the webcam and the microphone and begin to speak. If they are sharing any content, they can either upload a file or presentation or they may share their screen. More information may be found here: Conducting Your Collaborate Ultra Session.

Faculty Spotlight: Dawn Burau

One Adjunct Faculty Workshop Delivered Three Ways

Dawn Burau, Instructor of Expressive Therapies, Art Therapy

Dawn Burau, Instructor of Expressive Therapies, along with fellow Lesley faculty Valerie Blanc and Jason Butler, ran a three-part workshop for adjunct instructors in the Expressive Therapies graduate division called “Engaging Students: In Class and Online Discussion.” Participants attended the workshop in person or online via Blackboard Collaborate Ultra. For those who missed the live event, an edited recording and other resources were shared online in the Expressive Therapies Faculty Community in myLesley.

Dawn decided to live stream and record the face to face workshop because, “many of our adjuncts have jobs or families that make it difficult to come to campus during the day. For those who could, we wanted to give them an in-person learning experience. For those who couldn’t, we wanted to include them in the community and give them access to the information we were sharing.”

In order to reach her goal of making the workshop content accessible to all adjuncts, Dawn reached out to eLearning and Instructional Support (eLIS) to help go over her game plan and receive technology training. For the workshop, Dawn set up a laptop running Blackboard Collaborate Ultra and acquired a 360 microphone to ensure that all participants could hear each other, whether in the room or online. Dawn used Collaborate Ultra’s built-in recording feature to record the workshop, which she edited and posted in the faculty community along with PowerPoints and other workshop resources.

With a little planning and creative thinking, Dawn was able to make an interactive workshop much more interactive and accessible to all of her adjuncts. If you are interested in exploring the use of synchronous online meeting tools or want to record and share academic events, reach out to us in eLearning and Instructional Support (elis@lesley.edu). We are happy to work with you to devise new ways to engage with students and colleagues.

Resources on how to use Lesley supported software like Blackboard Collaborate Ultra can be found on the Lesley Technology Support Site.