Tips for Reducing File Size

Do you have large document files that you are trying to send to colleagues or upload to an online site such as myLesley, VoiceThread, OneDrive, or SharePoint? In many cases, compressing your files, images, and videos will help to reduce your overall file size and meet size restrictions.

As a best practice, when uploading large files you will want to make sure that you are using a fast, stable Internet connection.

Documents (Microsoft Word)

You can reduce the file size of your document by compressing images. The compression options reduce both the file size and image dimensions based on how you intend to use the picture, such as viewing on screen or in an e-mail message. You can compress all images in the file or just the ones that you select.

For more information see:
Reduce Your File Size in Office for Mac
Reduce the File Size of a Picture in Microsoft Office (PC)

Presentations (Microsoft PowerPoint)

You can reduce the file size of your presentation by compressing images and media content. The compression options reduce both the file size and media dimensions based on how you intend to use the media.

For more information see:
Reduce Your File Size in Office for Mac
Reduce the File Size of a Picture in Microsoft Office (PC)
Compress Your Media Files

PDFs

You can reduce the file size in your PDF by compressing the entire PDF. This will reduce overall file size.

For more information see:
Optimizing PDFs in Acrobat Pro
Reduce the Size of Your PDF Online using Small PDF

Images

You can reduce the file size of your images by resizing. Please note that resizing an image will slightly reduce the image quality.

For more information see:
How to Resize a JPEG Using Paint in Windows
How to Resize a JPEG Using Preview in Mac OS X
How to Resize a JPEG Using an Image Resizing Website

Video

You can reduce the file size of your videos by saving in a different format, resizing, or compressing the file. Please note that this may slightly reduce the video quality.

For more information see:
How to Reduce Video Size Using Handbrake on PC
How to Reduce Video Size Using Handbrake on Mac
How to Reduce Video Size Using iMovie (Mac)

Introducing Kaltura ASR Captions

Kaltura Media has the ability to automatically add captions to your video content using automatic speech recognition (ASR). When a video is uploaded, the ASR processes begins immediately. Captions are created based on the audio track and the content is assumed to be in English.

Why are captions important?
Accurate captioning of audio and video content ensures that people who are Deaf and hard of hearing can understand the content. Additionally, captions are very useful to non-native English speakers, viewers watching in a sound-sensitive environment such as a library, can help viewers with learning disabilities or attention deficits maintain concentration. and can help all learners improve comprehension.

The following video effectively explains the importance of captioning.


How are captions created?
All videos created after August 6, 2018 will be auto-captioned. This means that once you create your video or upload your video to Kaltura, ASR captions will be automatically ordered and applied to your video. The process may take several minutes to several hours, depending on the length of your video.

What about older videos?
You can request ASR captions for any videos created before August 6, 2018. Detailed instructions may be found here: Add Captions to Previously Uploaded Video Content.

How accurate are ASR captions?
ASR captions are only 80% accurate and accuracy may vary depending on the audio quality, clarity of speech, background noise, etc.

While 80% accuracy may seem pretty decent, please keep in mind that this means that, in general:

  • 1 in 5 words will be incorrect
  • An 8-word sentence will be about 17% accurate
  • A 10-word sentence will be about 11% accurate

How do I improve the accuracy of my captions?
While ASR captions are a step forward for accessibility, we recommend editing them for accuracy. You can edit your captions right in your web browser – no additional software is needed! For more information and detailed instructions, see Review and Edit Captions.


Provide Grading Feedback With Audio and Video

Blackboard now allows you to embed an audio/video recording of your feedback as you grade attempts. This feature is available for all graded content, including assignments, graded discussions, or in the Grade Details area of any Grade Center column.

Why Provide Audio or Video Feedback?

Providing feedback using audio or video allows you to connect with your students, especially those at a distance. You can give them a glimpse of your personality and show them the real person behind the text. Creating this connection can make it easier to interact, share information, and ensure that your students don’t feel isolated.

Text-based feedback can lend itself to misinterpretation – students may weight all of the feedback equally or be overwhelmed by a lot of text on the page. Audio allows you to add tone and emphasis, perhaps even humor and support, while video allows you to add facial expressions and gestures.

How Do I Add Audio or Video Feedback in my Course?

You can add audio or video feedback on any gradable item in your course. To do so, access the Feedback to Learner area. You may do this directly from an Assignment or from within the Full Grade Center.

From within an Assignment:

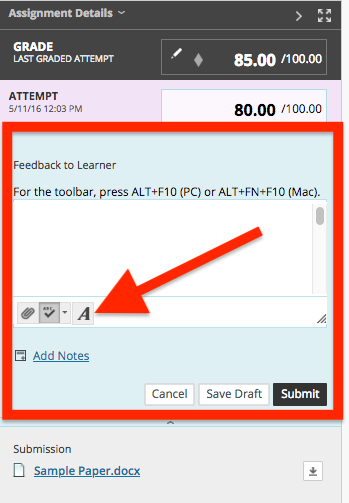
From your student’s submission, navigate to the Assignment Details area. In the Feedback to Learner area, In the Feedback to Learner area, click on the Full Content Editor button. This will open the full text/content editor.
Screenshot of Feedback to Learner area of Assignment

For more information on grading assignments or accessing the students’ submissions, see Grading Assignments in myLesley.

From a Grade Center column:

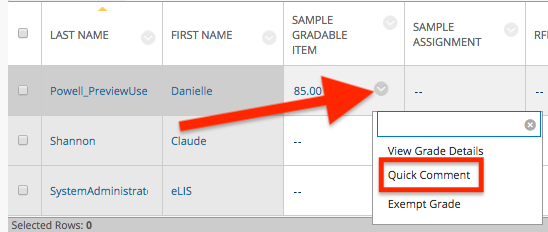
Navigate to the Full Grade Center and hover your mouse over the item you wish to offer feedback. Click the chevron to open a menu and select Quick Comment.

screenshot of accessing Recording Feedback from within the Full Grade Center

Launch the Recorder:

From the Full Text/Content editor, click the Record Feedback Button (first button on the third row of the text/content editor).screenshot of record feedback button

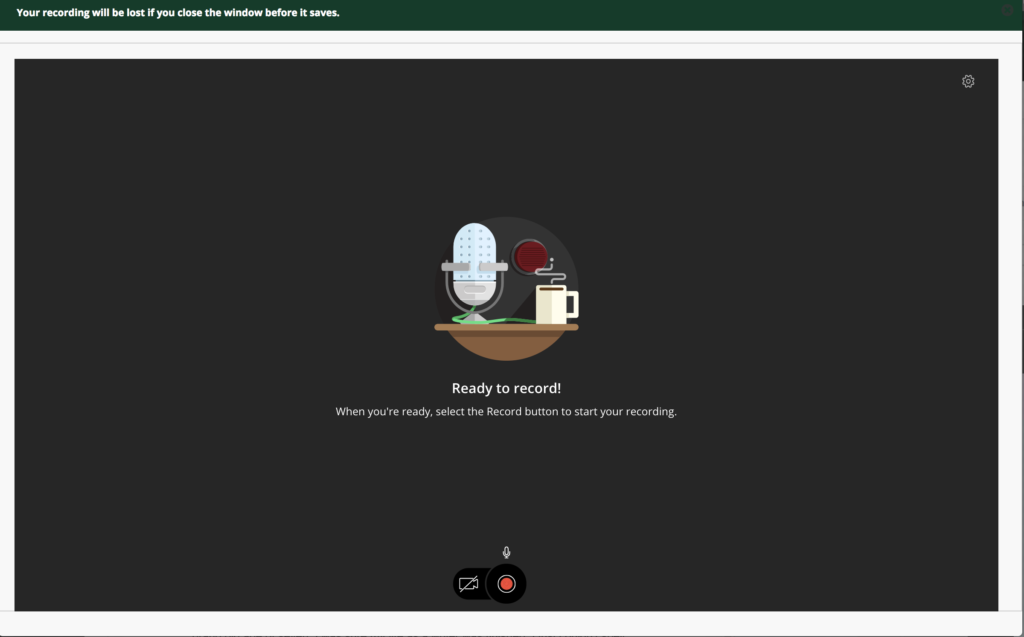
This will launch the recorder. Click the video button to launch your webcam or click the record button to record audio only. Each recording may be a maximum length of five (5) minutes.screenshot of record feedback

Once you have finished recording, your audio or video recording will be added to the student’s feedback area. Detailed instructions for using the Record Feedback option may be found here: Record Audio and Video.

What if I want to upload a video I recorded elsewhere or provide my students with a screencast?

If you recorded a video in a different tool, you may upload it using the Kaltura Mashup Tool. You may also upload a video to Kaltura directly from your mobile device.

If you would like to record a screencast, you may use Kaltura CaptureSpace Lite.

Where can I find more information on providing feedback to my students?

To find out more about providing feedback to your students, check out the resources below:


VoiceThread Introduces a New HTML5 Version!

Say goodbye to Flash! VoiceThread has introduced a new HTML5 version, which runs in your browser without having to install and enable Flash. The new HTML5 version looks and feels the same as the Flash-based version, but now offers new features suck as adjustable playback speed, streamlined audio/video recording, and increased security.

How do I switch over to the new HTML5 version?

You may switch over to the new HTML5 version at any time. To begin, log in to VoiceThread.

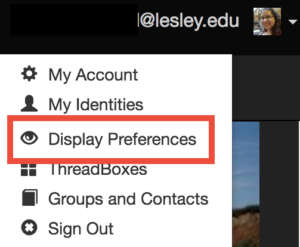
Click on your email address on the top right-hand side of the page to open a menu. Select Display Preferences.
VT Display Preferences (screenshot)

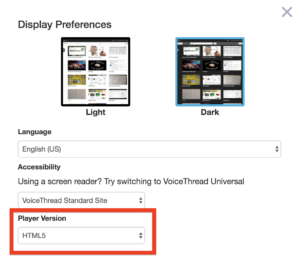
In the Player Version section, select HTML5.
VT Preferences Select HTML5 (screenshot)

Refresh the page. You will now be upgraded to the new HTML5 version of VoiceThread.

Which web browsers are supported?

Chrome and Firefox are fully supported. Please be sure to use the most up-to-date version of the browser for the best experience.

HTML5 audio and video recording is NOT supported on Safari or Edge browsers at this time. You may use Safari or Edge to view a VoiceThread but you will not be record audio or video until the browsers have been updated to support this feature. Internet Explorer (IE) is not supported.

When is the deadline for moving to the HTML5 version?

You may switch over to the new HTML5 version any time between now and December 31, 2017. After that date, VoiceThread will automatically transition everyone to the new HTML5 version.


Fall Bootcamp 2017: Teaching and Learning with Technology

Are you interested in adding more instructional technology to your course but not sure where to start? Jump into your fall teaching with a half-day learning technology bootcamp to learn how to effectively use technology in your course.

The workshop will consist of sessions on using the learning management system (Blackboard) to enhance your face-to-face course and hands-on experience with some of the technology tools you can use to enhance your course. Topics covered will include:

  • Using myLesley (Blackboard) to communicate with your students
  • Adding content to your myLesley course
  • Adding Video to myLesley (Kaltura)
  • VoiceThread

Event Details:
Tuesday, August 15, 2017: 1:00-4:00 PM
University Hall, 3rd Floor

Space is limited in this workshop! REGISTER by August 8th to reserve your seat. Click here to register.