April Faculty Community Conversation: Incorporating DEI Into Your Course Content

There are many benefits to incorporating DEI into our course designs. Creating an inclusive environment allows us to connect and reach a wide range of students. Incorporating DEI motivates students and supports a positive educational experience with multiple perspectives and backgrounds. In April’s Community Conversation, Lesley faculty Maureen Creegan Quinquis and Aya Karpinska joined Kay Martinez, Director of DEI Training, Education, & Development, to share strategies, reflections, and their ongoing journey to make more intentional and informed choices with their course content and activities.

Maureen began our conversation by sharing her course, “Equity, Access, and Inclusion through Arts Based Inquiry” for K12 classroom teachers. In the first class assignment, she shares a single photo of herself and asks students to list assumptions about her gender, ethnicity, personality, physical abilities, etc. One cohort assumed she was Italian after the first meeting because she gestures a lot with her hands. Their answers then lead to a discussion and activities around misconceptions we make based solely on visual information and how assumptions are created. “Are they an inside job or culturally created?”

Some of Maureen’s students also use Mursion, a virtual reality tool that allows student teachers opportunities to practice classroom scenarios including how to deal with bullying and microaggressions. Students using the tool encounter a diverse group of middle school student avatars in realistic situations that don’t have a script. Students can practice specific scenarios and learn to confront biases in a low-stakes environment before stepping into a real classroom.

Aya has taken an iterative approach to teaching her History of Interface course and providing a more diverse view of technology. Many technology interfaces and programming languages have been created by white, western men and most of them in English. This creates a bias and an impact on how technology is created and used. Since many of the texts shared in her course are also by white European/Western men, Aya has been going back and asking herself why she selected this source. Is there another text that could be used instead to bring a different perspective? Are there other modalities of learning that can be used such as a graphic novel about Ada Lovelace, the originator of the algorithm.

Aya’s course has a module on the history of textiles asking the question “How do we define technology?” In it she looks at sewing, the spinning jenny, and knitting. Some programmers say that knitting is a turing complete process and that the definition of knitting is similar to the definition of a computer. She shares the role of the seamstresses who created the space suits for the astronauts who went to the moon highlighting the untold stories of the women, people of color, and the disabled individuals behind the scenes.

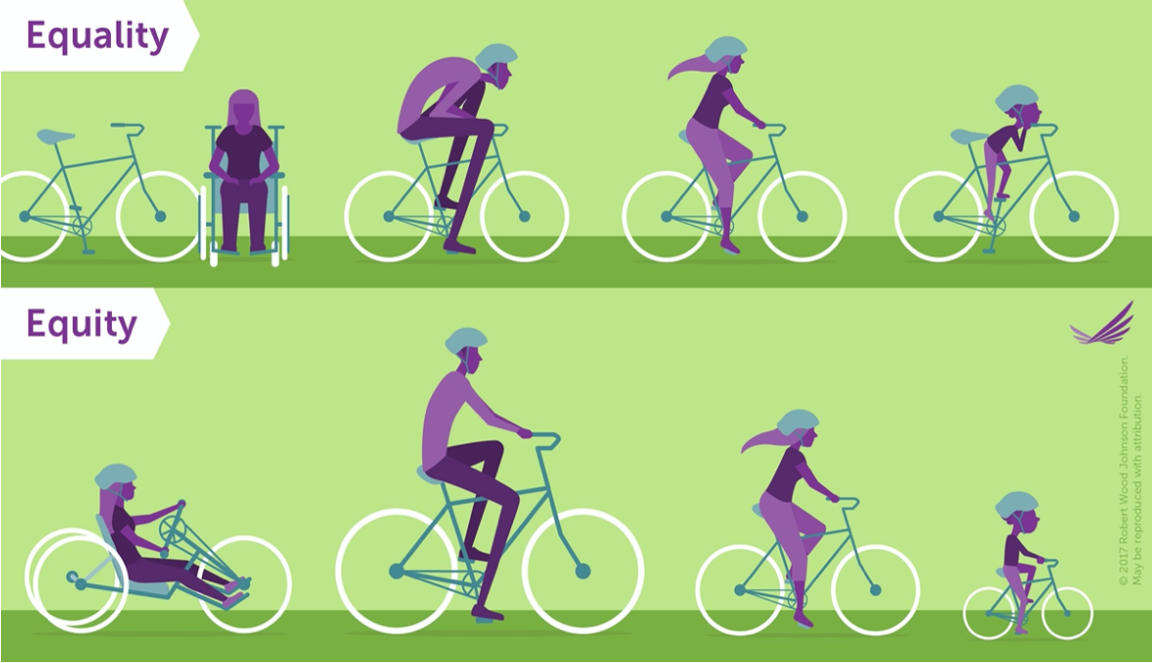
Kay discussed the shift from DEI, diversity, equity, and inclusion, to EDIJ, equity, diversity, inclusion, and justice, leading with equity and adding justice to the conversation. It’s an important change that reflects the values and our framework as an institution. To illustrate the difference between equality and equity, Kay shared this bicycle image, in the top half everyone has a bike, but it’s not designed for each person’s needs. In the bottom half of the image, each person has a bike that has been adjusted to the needs of the individual.

The top row shows four people with the same bike. It is is only suitable for one person. The bottom row shows four people with a bike that suits each person.

Kay then asked the question “How does the curriculum reflect the students in your classes?” As a queer, trans person of color, Kay never saw themselves in the courses they took or in their higher education experience at large. Students look at Kay as a “unicorn” where they didn’t know people like them existed in higher ed.

Kay suggested creating a shared community agreement with your class. Begin by saying that this is a share learning space. It is not top down, but a circle. I will learn from you, my students, as you learn from me. Use the one mic rule, one speaker at a time, to mitigate disruptions and provide support for those who get interrupted. Acknowledge the relationship between intention and impact. This means assuming positive intentions, but you must still address the impact that the statements had on the class. Use the word “ouch” as a way for students to indicate that that statement hurt and “oops” to say that it wasn’t intentional.

Our panelists all agree that while this is important work, it’s not always easy. As Aya stated, be “forgiving of my ignorance” and be iterative with your course design. You won’t get everything right all the time but providing a more diverse and multifaceted perspective in your course will be hugely beneficial to all of us.

Resources

The EDIJ Training site has lots of training materials and information including Kay’s presentation for this conversation.

Check out the Lesley Library’s Lib guides. There are multiple guides for DEI, but Including Underrepresented Perspectives in Your Course may be a good place to start.

Ensure your resources are fully accessible to all your students. Ally is integrated into all your myLesley courses and review your uploaded documents for potential issues and provide guidance on how to fix them. Learn more about Blackboard Ally and review the Accessibility Checklist.


Check For, and Fix! Broken Links in Your Course

What can you do to prevent students clicking on links for required readings in your course and discovering that materials they are responsible for are missing? Links in new courses break for various reasons. It could be that the course copy process itself has somehow broken some links, though this is rare. It’s more common (and understandable) that pages linked to in your course have either been taken down or simply changed location on a revised site.

It’s good practice to proactively go through your course right after it’s been copied over and click on each link to make sure that they all work. Even if your course has a lot of links, the simple act of clicking on all of the links should not take too long. The part of the process that may take longer, depending on what you find, is fixing each link that doesn’t lead where it’s intended to.

The next step is to find the addresses for the materials you want to use when you rebuild the links. Start with searching the site for the information you’re looking for; most ed sites will have a search function. If you find that the information you want to pass along is either revised enough to no longer be useful or missing from the site altogether, you may need to find an alternative if the information is vital for your students. (Hint: you might use Lesley’s Ask a Librarian service for assistance with this.)

Once you have the new link in hand, saved to a word document or opened in a separate tab in your browser, you’ll need to build a new link, and then delete the old one. I recommend deleting the old link after building the new one, because it’s easier to see where the new link should go and should make it easier to identify and make any revisions in the language in your text in order to accommodate the change.

Here’s how to create the new link using Blackboard’s text editor, adapted for this post from our knowledge base article at support.lesley.edu:

Adding Links

When pasting links to websites such as YouTube and Vimeo, the videos are automatically embedded for inline playback. Simply paste the link in the content editor and Blackboard will automatically embed the video.image of the Blackboard content editor with an image added.

Other links, such as those to other websites, may display a preview of that page.image of the Blackboard content editor with preview of a linked page.

To ensure the links you create are accessible, your language should convey clear and accurate information about the link’s destination. For example, instead of adding a link to the text “Click here”, include the full title of the destination page, such as “Microsoft Office Support Resources.”

To create a link, click on the Insert/Edit Link button in the content editor (it’s the one in the second row that looks like two links in a chain.) You will be prompted to enter the URL (you may copy and paste the link from your browser or the word document mentioned above), the text to display (the descriptive word or phrase you want to use as your link), and select “Open link in… New window.”image of the Blackboard insert/edit link window.This last bit is important; Blackboard/MyLesley works better if you set the link to open in a new window. Clicking a link that is not created in this way will send you to an intermediate page warning you that you are about to leave your course site, which can be confusing. Using a new window will also help your students navigate back and forth between the content you are linking to and the course itself with a single click on a browser tab.

For more information about other aspects of working with the new text editor, view Using the myLesley Text/Content Editor on our support site.


March Faculty Community Conversation: Student Presentations

We’re all familiar with the traditional end-of-semester final presentation where each students speaks to the class for a period of time, often while sharing Powerpoint slide. But what if it could be different? This March Ingrid Stobbe, Assistant Professor of Digital Filmmaking, and Jason Butler, Associate Professor of Drama Therapy, led our Community Conversation on alternative ways to do student presentations or as Jason put it, how we can “play and innovate with our students.” 

Ingrid teaches film production and theory classes at Lesley and one of her students proposed an alternative. He wanted to create a short film as his presentation. As with any other presentation or final paper, he started with his thesis statement: Pink Floyd’s “Live at Pompeii” was an innovative documentary that merged the medium of music with innovative techniques that were starting to appear in documentary filmmaking of the time. He then provided Ingrid with an outline where his thesis statement would be supported by media clips. Ingrid liked the idea enough to open the option up to all the students in the class. They still needed to hit the objectives of the assignment, synthesize what they had learned in class, and communicate that information to others, but it allowed filmmaking students a chance to express themselves in their own medium. For Ingrid, the question at the end of the day was “Is there a way that I can support and allow for the key moments in my class?” 

Ingrid’s alternative presentations were the result of a student request. However, Jason purposely designed his into his Drama Therapy course. Jason based his approach on Universal Design for Learning theories (UDL) where multiple avenues are provided for students to engage with the content and to share their knowledge. 

Jason had both asynchronous and synchronous elements to his course assignments. Students began by creating a fictional story and character to learn about embodiment. They then created short videos of themselves showing how their character is embodied. In the follow up assignment, students compared autobiographical theater with self-love pieces. Many students created traditional Powerpoints, but others did a more creative interpretation which was then shared in VoiceThread. VoiceThread allows the presenters to have traditional slides, images, and video. Viewers can provide feedback in multiple ways, text, audio, or video, allowing them some choice in how they respond.    

Jason also had some tips for synchronous presentations. He hides non-video attendees in Zoom and then asks the students who aren’t presenting to turn off their camera in order to create a stage for the performers on screen. Other times, he asks students to move closer to the camera if they agree with what is being said and to move away if they disagree in order to get the audience involved and interacting rather than just sitting back and watching. He also uses the reaction buttons in Zoom or asks the viewers to enter a word or two in the chat that expresses their thoughts on the presentation.   

But how do you assess such innovative assignments?  

According to Ingrid and Jason, you must give it structure. Jason shares the criteria of what needs to be covered while Ingrid has a workshop day where the student comes in with an outline of the goals they need to meet and how they will do that. While you are providing the student with some flexibility and room to explore, it must still meet the assignment criteria and stay within the boundaries of what the instructor can grade. Having a rubric helps communicate the criteria and to grade.  

How do you provide options when you teach more traditional content?  

Look for places where you can provide a little bit of choice for students. Where can you provide a small piece of creativity for them. Your students might not be ready to dance their dissertation, but can they share a picture or a piece of music that will transmit another aspect of the article they presenting on? The process forces us to think in different ways. 

One significant goal is to create a classroom culture where students feel empowered and comfortable talking risks and stepping out of their comfort zone. Small gestures over time where you allow students choice or opportunities to be themselves helps to create that safe space. Jason shared that in partnership with UDL, there’s a trauma-informed pedagogy perspective that says when we are activated due to trauma, we can’t function or reason… or learn. One of the common reasons for trauma is a lack of choice. It’s difficult to properly engage with something when we feel that it is being imposed on us. Providing some form of choice in your assignments diminishes that activation and allows students to more fully participate. 

Do you provide alternative ways for students to share their knowledge? Let us know how. 


Which Tool is Best?

One question we in eLIS are often asked is which tool is best for a particular assignment, or the obverse; what sort of assignment would a particular collaborative tool work best for? The answer, which I always imagine frustrates instructors looking for clear, unambiguous information to apply to their teaching practices is, “It depends.” We also make the point that it’s important to start from your learning objective and go from there. The tool should always be in service to what you’re trying to accomplish.

Once you have your objective defined, there are a number of considerations that can go into choosing which tool to use for, say, asking students to reflect on a reading, getting formative feedback to help determine what to emphasize in an upcoming unit, or encouraging your students to interact to inspire collaborative learning. Should you use the assignment tool or a journal? The discussion board or a blog? A wiki or VoiceThread? There may be instances where one or the other of these tools is the clear best choice, it’s true.

However, one of your main considerations should be what’s convenient and familiar to you and your students: what tool you know well enough that you can create an exercise that will bring the material or concepts you’re working with to life for learners. There’s no one tool that’s going to be the best in all instances, but if you have a go-to tool, you can almost always figure out a way to make it work for the task at hand.

In my parents’ home, the go-to tool for around-the-house, quick-fix situations was a butter knife. We used them to drive screws, scrape gunk off of pots and pans, pry up nails or push-pins, remove staples, open envelopes, scrape off excess putty or glue from quick repairs, spread butter on bread or baked potatoes, cream cheese on bagels, icing on cake, pull up burning toast out of the toaster, or in any number of other scenarios.

It may surprise you to learn that my dad was an auto body repairman, and there was always an extensive collection of tools out in the garage at our house, one of which could do almost any particular (non-food-related) job a little bit more efficiently. But a butter knife was handy, right there in the kitchen, and frankly, it did most of the jobs it was apt to be used for nearly as well as the thing you would have to go out to the garage on a cold night and rummage around to find.

Arguably the most versatile tool in Blackboard/MyLesley’s suite of tools is the discussion board. While there’s no justifiably convenient way to make it function as a private journal, for example, it does have capabilities well beyond its named purpose. It can be used as a makeshift blog or as a place to host visual student work, which is the way we most often see the wiki tool used. We’ve also seen it used as a place for students to post assignments.

The discussion board can be made gradable. Using the viewing setting “Participants must create a thread in order to view other threads in this forum,” it’s easy to make sure that students don’t see each other’s work before they submit their own. Once they do, they can automatically view the work of their peers. With the default settings of MyLesley forums, students are not able to edit their own work once it’s been submitted, although you can change that setting if you wish.

While the discussion board may be the most versatile tool in MyLesley — the true “butter knife” in your course site — it’s certainly true that virtually any of the tools available in your course site can be used in unexpected ways. It only requires your creativity and resourcefulness to find those new, unconventional repurposings.

How have you used MyLesley’s suite of tools in novel ways? We’d love to hear about it.

Community Conversations: Peer Feedback

February’s Community Conversation focused on Peer Feedback, led by CLAS and LA+D faculty Kim Lowe, Summer Clark, Lisa Spitz, and Bill Porter. They are members of a longstanding research group that looks at ways to implement and improve peer review and critique and to “create a better learning experience.”  

Kim Lowe kicked off the conversation by explaining how she had hated peer review as a student and had vowed, “when I became a professor, I would never do it.” However, she saw the learning benefits and found the peer review protocol the group created highly effective for her students.  

Creating the Peer Review Protocol

In 2016, the interdisciplinary group began to study peer review by researching best practices for conducting peer feedback assignments, the benefits of peer feedback, and how to address challenges. The benefits of peer review include self-reflection, self-regulation, critical thinking, and communication skills that transfer not only to other classes, but to students’ professional careers. It enhances empathy and students’ ability to navigate social and emotional interactions in the classroom while exposing them to perspectives and opinions other than those of their instructor.  

Peer review also requires students to participate at a higher level of engagement. They must spend time and energy to provide constructive feedback that the other student can utilizeHowever, students may not trust the feedback they receive from other students and may not be sure if they should apply it or not. Students may even doubt their own ability to provide feedback.  

Due to these challenges, the first stage of the peer review protocol the group developed is to prepare students to do peer review. In this stage, the instructor builds trust in the process by discussing the strengths of peer review and, perhaps even more importantly, the reasons why they may be skeptical. Faculty should also discuss how peer review will be used within the class and model what effective peer review looks like. It’s also important to assess the feedback given, not just the assignment being reviewed.  

The second stage, the peer review session, is a scaffolded dialogue where students submit their assignment, identifying the areas where they most want feedback. Other students then provide feedback using a rubric or by answering a series of questions to guide their feedback. Students then review the feedback they received, rewriting it in their words to encourage processing, and determine how or if they will apply it.  

In the final stage, students revise their assignment. They also submit a summary noting how they implemented the feedback they received and the reasons why they made those choices. The instructor then assesses both the assignment and the student feedback.  

Internal-External Dynamic of Peer Review process

Q&A

One question asked of the group was if peer review was spreading beyond art and literature courses. Summer Clark spoke about using peer review to help her education students create better lesson plans and believes that it can be used across disciplinesThe group encourages faculty to co-create criteria for reviewing work in order to create consensus and understanding around what qualities embody good work, regardless whether that work is a drawing, essay, presentation, or business analysis.  

However, that was just the beginning of the discussion, which included brainstorming strategies with the other attendees. Watch the recording to hear more and join our Faculty Community Conversation Team to continue chatting