Set Up Your Grade Center in myLesley

Setting up the myLesley Grade Center is not always the most intuitive thing. However, with a little bit of thought, it doesn’t have to be difficult.

Step 1: Create Your Plan

The first mistake most people make is they start in the Grade Center. Going into the Grade Center is usually the last step. If you try to set it up piecemeal, you will inevitably miss a step or forget what you entered somewhere and then before you know it, you’re lost.

The first step is to grab you syllabus, list out your assignments and grading scale, and make a plan. Watch the video below to see an example.


Step 2: Create Your Content & Assignments

The next step is to create my content in Blackboard, assuming I haven’t already done this. I’ve already created most of my content, but I still need to create the Final Project assignment. This video from Blackboard shows me exactly how to create an Assignment so my students can submit their work and I can grade and provide feedback.

Need to create graded discussions? Review how to create discussion forums on our support page.


Step 3: Create Grade Columns

Now that I have created all of my content and assignments, I can finally go to the Grade Center and finish setting things up.


Step 4: Calculated Grade Columns

Decisions, decisions… Total column or Weighted Total?

See our support article on Calculated Grade Columns for step-by-step instructions.


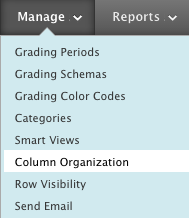
Step 5: Organize Your Grade Columns

All the grade columns are set up and ready to go, but Blackboard has them organized based on the order they were created. This might not be the ideal set up for you. So change it.

View Blackboard’s video tutorial on customizing your Grade Center view for more information.


Additional Resources

Your grade center is now set up and ready to go, but there’s always more to know and more scenarios for set up. Check out these resources below or email elis@lesley.edu for assistance.

myLesley Grade Center and Grading
Advanced myLesley Grade Center and Grading

Grading myLesley Assignments
myLesley Rubrics
myLesley Faculty Resources


What to Look Forward to in Blackboard for Fall 2014

On August 26, 2014, myLesley will be upgraded to the latest version of Blackboard (Blackboard Learn 9.1 April 2014). This scheduled myLesley upgrade will resolve known issues and include several new features and enhancements that are especially useful for faculty. They include:

Student Preview – Quickly View Your Course as a Student
Toggling the new Student Preview button provides instructors with the capability to see and experience their myLesley courses exactly as their class does. While in Student Preview mode, instructors can perform the following student activities: submit assignments, take tests, create blog posts, create journal and wiki entries and view traditional student only tools, such as My Grades. For more information, review the Details or watch the Overview Video below.

SafeAssign
SafeAssign, the tool that reviews assignment submissions for plagiarism, is now integrated as an option right in the Assignments tool and also includes a suite of new reporting features. For more information, review these Details.

Atomic Learning
Atomic Learning is a free service available to all Lesley students and faculty. Atomic Learning features hundreds of self-paced video tutorials on popular software tools and online resources. You can now add these tutorials directly to your myLesley course for students to review without needing to login to a different site. See our Atomic Learning tutorial for more information.

Achievements Tool
The Achievements tool allows instructors to define criteria for issuing rewards to students in the form of both Badges and Certificates. Students can see which rewards they’ve earned and what’s required of them to receive additional rewards, providing insight into learning progression toward defined competencies. For more information, review the Details or watch the Overview Video below.

Anonymous Grading
Instructors can hide student names from submitted assignments for anonymous grading. Review the Details for more information.

Grade Center Tips & Tricks

The Grade Center is a great way to keep track of your grades and provide feedback to your students online, but it can seem cumbersome when you first start using it. Below are a few tricks for getting around more smoothly. You can gain access to your grade center by clicking on the link located in the class menu.

Screen Shot 2014-04-15 at 8.45.31 AM
Be Sure to View the Icon Legend

The Grade Center uses several icons to indicate the status of a student’s submitted work. To review the meanings of these items click the “Icon Legend” button located in the bottom right-hand corner of the main Grade Center view.

GC_Icons_New

How-To Organize and Re-Arrange Your Columns

When you create new grading columns, the Grade Center always places them at the end of your view. You can rearrange them based on due date or type of assignment to more easily find the grade column you’re looking for. This will also assist students in quickly locating their graded work in an orderly fashion.

To reorder your columns, click on Manage in the toolbar and then Column Organization.

manage menu

Your columns will be displayed in rows. Click on the small move icon at the beginning of the row and drag the row to your preferred location. Drag rows that you would like to be frozen above the gray row. These will remain fixed in place at the beginning of the Grade Center as you scroll through the columns. Note: Most faculty find having the student’s name frozen to be very helpful.

organize columns

Hide Columns You Don’t Need

You probably don’t need the Availability column or the Student ID column. They’re just taking up valuable visual real estate on your screen. Hide these from your view by clicking on the column menu and selecting Hide Column. Be aware that this does not hide the column from your students’ view in My Grades.

To hide a column from your students, select Show/Hide to Users from the column menu. The column title area will display a dark gray circle with a red bar  
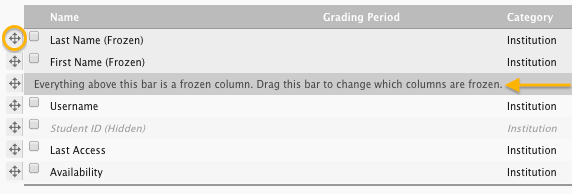
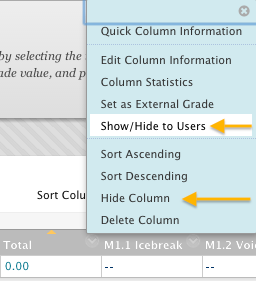
through it to indicate that it is hidden from the class.

show hide users

Use the Built-in Navigation Tools

Tired of clicking into an assignment and then back out to the main Grade Center and then into the next student’s assignment over and over again? Use the navigation options at the top of the Grade Details area. Click the forward and back arrows to go to another student or grade column.

navigating grade details

To access Grade Details, click on the menu icon in a grade cell and choose View Grade Details.

View grade details

Additional information about using and successfully navigating the Grade Center is available on our resources website.