Merging Your Content with the New Course Menu

A new course menu and template were created for this Fall. The purpose was to create more consistency for students across all their courses and to embed supports where possible. However, if you are copying content from a previous course in myLesley to your Fall 2020 course, you may need to merge the two and clean things up a bit.

What’s in a course menu?

There are three main types of course menu items: content areas, tool links, and web links.

Course Content & Assignments is a content area
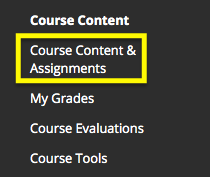
Content Areas are places in your course where you post various types of course content, such as items, uploaded documents, assignments, and more. Think of them as a folder on your computer where you group common items together. Course Content & Assignments is an example of a content area.


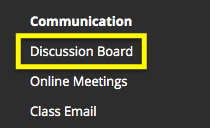
Tool Links are links to tools that are part of Blackboard or integrated into Blackboard, such as Discussions Boards, Class Email, My Grades, etc.


Technology Resources is a web link
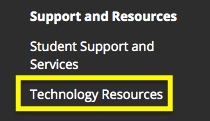
Web Links are links to external content. This external content can be anything on the internet that you wish to link to. For example, Technology Resources links out to the IT & eLearning Support Site at Lesley.


Course content and Communication are headers in course menuThe new course menu also contains Headers. These are non-clickable titles for groups of related content. They can be renamed, edited or moved just as any other menu item. “Course Content” and “Communication” are examples of a header.

Your course menu is completely editable by you. Course menu items can be renamed, moved, deleted, and hidden from student view.

Modify menu

A Common Issue After Course Copy

If you copy your course content from a prior course you may notice that you have menu items for “Course Content” and for “Course Content & Assignments.” myLesley (Blackboard) will not merge these two content areas together automatically. Just as with folders you create on your computer, these are two separate containers with different names. You need to tell Blackboard what you want it to do.

Fix your course menu in 3 easy steps

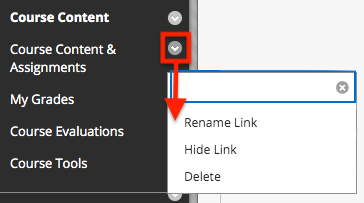
1. Rename menu items

Many faculty choose to rename the older “Course Content” menu item to “Course Content & Assignments.”

For more information see Modifying your Course Menu.

2. Delete menu items

Delete the original (now duplicate) placeholder content.

Be very sure to delete. There is no undo.

Also, delete any duplicate or unneeded menu items that copied to clean up your course menu and make it easier for your students to navigate your course menu.

3. Reorder menu items

When a course copy is done, all new content copied in is at the bottom of the menu. You can easily reorder the menu items, but clicking on the double arrow icon to the left of the menu item and dragging it to a new location.
move icon


For more information see Modifying your Course Menu.

Is Your myLesley Course Ready for Fall?

Is your myLesley course ready for the start of the semester? This handy list can help you make sure. Download a copy to review as you set up your course.

Announcements
Have you posted a welcome announcement for you students? Is textbook information available? Learn how to send an Announcement with all your important information before the first day of class.

Faculty Profile and Contact Information
Is your contact information available and up-to-date? Create a faculty profile or create an Item with your contact information.

Syllabus
Have you uploaded your current syllabus? Upload your syllabus to myLesley so it’s always easily available.

Course Content
Have you checked all the links in each module? Learn to add or edit hyperlinks in myLesley.

Are discussion forums for each week set up? This guide will show you how to set up and manage the myLesley discussion board.

Have you set up release dates for each module? Using release dates is optional, but can help you reveal content to your students on a schedule that you set in advance.

Assessments
Have any tests or surveys been deployed? Create and manage your tests and surveys in myLesley.

Have any Assignments been set up for students to submit their work? Create and manage assignments to collect and grade papers online.

Grade Center
Are the correct point values assigned to each item in the Grade Center? Are there any grading columns that need to be added or deleted? Review how to set up and use the myLesley Grade Center.

Additional Content
Depending on your course and the type of activities you have, you may or may not be using the tools listed below.

Have any wikis been set up?
Have any blogs or journals been set up?
Have any course groups been set up?

Have you created or updated any VoiceThread content?
Have you created or updated any VoiceThread groups?


If you need assistance, please contact us at elis@lesley.edu or visit http://support.lesley.edu.


Getting Ready for the Fall

It’s that time of year again. Summer is winding down and the first day of Fall classes is approaching… too fast. We’ve gathered together some past posts and links to tutorials to make your prep easier and your myLesley course awesome.

Getting Your Content into Your Fall Course
The first step is to get your content into your upcoming myLesley course site. If you’ve taught the course before using myLesley, there’s no reason to recreate all that content from scratch. Just copy it. Review the directions for copying myLesley courses or request a course copy from eLIS.  

Once your content has been copied over, you will need to make a few updates for the current semester, such as updating your syllabus and updating all those dates. You can easily update your syllabus and all the links to it throughout the course in one easy step. Review Updating Your Syllabus in myLesley to learn how.

Did you use the calendar tool, release dates, or due dates in your myLesley course? Think going through and manually updating them all is going to be a major task? Think again. Use the Date Management tool and update them all on one page.

Check out Adding Content to Your myLesley Course to update or create new content items.


Communicating with Your Students
Now that your course content is ready go, it’s time to welcome your students. If you use Announcements or the Send Email tool in myLesley, you don’t even need to know their email addresses. Communicate with everyone in the course at once.

Take the normal text announcement or email up a notch and post a video announcement to introduce yourself and the course. Kaltura Media is built right into the text editor and will allow you to quickly and easily record a video message to your students using your webcam.


A Few Tips
To help you get ready for the upcoming semester, we have a few tips from our instructional designers on what to do before your course begins, the first week of your online course, and how to manage those busy online discussions.

Don’t forget about our support site at support.lesley.edu. We have a slew of tutorials and information from both eLIS and IT. If you can’t find what you’re looking for, submit a ticket and someone will follow up to help.

Have a great semester.

Updating Your Syllabus in myLesley

In this episode, Agent L helps faculty easily update their syllabus AND all the links to it their myLesley course.

BenBen Friday: Hi, Agent L. No time to talk now. We will have to grab coffee some other time. Must run.

Agent L: Ben, what happened? Why is everyone so busy?

Ben: A new semester started and faculty have uploaded their updated syllabi to their myLesley courses.

Agent L: That’s great! They are sharing their syllabi digitally instead of on paper. … Isn’t it…?

Ben: Yes, but they’ve linked to the syllabus from multiple places in their online course site. All of those links need to be updated with the new file. It’s a lot of work to go through your course to find and update them all.

Agent L: Ummmm…. Ben…. there’s a much easier way to do this.

Ben: What? How?

Agent L: We can overwrite the old syllabus file with the new one in Course Files. All the links to that file will be updated to the new file in one step. Here, let me show you.

Log into the course you need to update. Then go to the Course Management area in the left-hand menu.

CourseFiles  agent L

Click on Content Collection and then the Course ID for your course. It’s elis_training_2014 for this course. This will open up the Course Files area of your course. It contains every file (documents, images, videos) uploaded to your course.

Locate the syllabus file in the list. Now click on the gray arrow at the end of the file name. Select Overwrite File from the menu that opens.

overwrite file

Click Choose File and locate the updated syllabus document on your computer.

choose file

WAIT! THIS STEP IS IMPORTANT!
The new syllabus MUST have the same file name as the old syllabus. The contents of the document can change, but you will need to save the new syllabus with the same name as the old one.

YES NO
old file name Syllabus_English101.docx Syllabus_Fall2015.docx
new file name Syllabus_English101.docx Syllabus_Spring2016.docx

Once you have selected your updated syllabus file, click Submit.

That’s it. All the links to the syllabus will now download the new one.

Ben: You mean we don’t need to tediously go through the entire course and change all the links. We only need to replace the file.

Agent L: Yep. As long as the new syllabus has the same file name, it will work perfectly. It also works with reading lists, study guides, rubrics, images… any file really.

Ben: Wow! That’s great! Maybe I have time for coffee after all.


agent LTo learn more about how to best take advantage of your Course Files, see Blackboard’s Best Practices on Attaching Files. For more myLesley tutorials, visit the Agent Support Site.

OneNote: Note Taking Made Easy

Are you looking for an easy way to take notes on the go? Do you want to access your notes across all of your devices? Do you want to share and collaborate on notes? Yes? Let me introduce you to OneNote.

Microsoft OneNote product logo

What is OneNote?
OneNote is Microsoft’s digital notebook, allowing you to create and access your notes across all of your devices: PC, Mac, phone, tablet, and web.

Welcome to OneNote

Image from Microsoft

OneNote allows you to:

  • Create notes, to do lists, manage projects, and more.
  • Organize your notes with six levels of organization: notebooks, sections, subsections pages, and two levels of subpages.
  • Share and collaborate in real time.
  • Add multimedia items (audio, video, images, etc.) anywhere within a note.
  • Insert new or existing Microsoft Office content into your notes.
  • Clip any web page to OneNote and view it later, whether you are online or offline.
  • Set up Email to OneNote to allow you to send an email directly to OneNote, automatically creating a new note.
  • Create or edit notes offline and sync your notebook when you’re back online.

Wait, didn’t you already post about a note taking app?
Yes, Evernote is another useful tool for taking notes. You can find out more about Evernote in our previous post: Taking Notes Across your Devices

Should I use OneNote or Evernote?
As with most things, it comes down to personal preference. A few good breakdowns of the tools and side-by-side comparisons can be found here:

I’d like to try OneNote. How do I get started?
To get started with OneNote Online, log into your Office 365 account (http://lesley.edu/email), click the Apps button, and select OneNote Online.

access OneNote

To get started with OneNote on your computer, phone, or tablet, download the software for your device(s):

You will need to log in with your Office 365 Account using your Lesley email address and password.

For more information on using OneNote, see: