Teaching presence in online courses: The role of instructor-created video

The concept of teaching presence in online course environments originated from the Community of Inquiry framework of online and blended teaching, developed by Randy Garrison, Terry Anderson and Walter Archer from the University of Alberta Canada.  They define teaching presence as the design, facilitation, and direction of cognitive and social processes for the purpose of realizing personally meaningful and educationally worthwhile learning outcomes” (Anderson, Rourke, Garrison, & Archer, 2001).  While there are many elements supporting teaching presence, faculty are often interested in the impact of instructor-created videos on student learning.

Garrison's teaching presence

The effectiveness of video in supporting learning depends on a wide range of factors, but some broad guidelines can be helpful. For example, using video for whole-class feedback or guidance created specifically for one particular class or learning activity might be more impactful and less time-consuming to create than pre-scripted, canned videos. You may be curious as to the impact of your recorded visual presence within videos you create. In this video, the presenter reviews some research regarding the impact of having an instructor’s face in the video itself, as well as some general guidelines on the use of video.

In general with regards to instructor-created videos, we advise you to:

  • Focus on a specific assignment, on a challenging concept, or for a course or weekly overview
  • Use video for feedback or other facilitation
  • Use short clips or chunk into short clips (4-5 minutes)
  • Choose visuals that support the spoken narrative
  • Avoid using a talking head as the only visual
  • Do not be overly concerned about verbal mistakes
  • If you are creating videos to be used for multiple classes, consider how much time this may take and focus on issues or topics that are durable across longer periods (years) so that you can reuse the resource.

Additional resources on teaching presence:
Role of course design on teaching presence
One instructor’s point of view (research study)
Strategies for teaching presence

Lesley Instructors Publish in Journal “Literacy Research and Instruction”

Leah Van Vaerenewyck, a Lesley doctoral student, Valerie Shinas and Barbara Steckel, two literacy instructors from Lesley’s Graduate School of Education, have co-authored the article Sarah’s Story: One Teacher’s Enactment of TPACK+ in a History Classroom in the journal Literacy Research and Instruction.

The article focuses on the case study of one secondary History teacher and her approach to using technology in developing and supporting a socially-situated community of learners. The authors cite research suggesting teachers do not integrate technology within literacy or disciplinary curriculum at high levels (to support higher level cognitive skills, for example). They argue that to prepare students for higher education and employment, students must learn to think like scholars in the disciplines in which they study. For example, history students should be able to analyze primary documents, conduct research and synthesize information across various sources to draw conclusions. They argue that strategic and principled use of technology can support the development and maintenance of a community of learners focused on higher-level skill acquisition.

tpack visualization

TPACK, or Technology, Pedagogy, and Content Knowledge, is a framework built on Lee Shulman’s PCK (Pedagogical Content Knowledge). TPACK suggests the incorporation of technology with pedagogical content knowledge can produce more effective teaching. The authors suggest an expansion of the TPACK framework to include a sociocultural component and use this case study as empirical evidence to support an update to the TPACK model (TPACK+). They set out to “examine how sociocultural-oriented teacher knowledge, skills and beliefs intersect with TPACK in ways that leverage digital tools to create and sustain vibrant learning communities” (Van Vaerenewyck et al, 2017). Their observations showed strong evidence supporting this updated conceptualization of TPACK. The instructor’s use of learning technologies enabled the students to engage in authentic disciplinary discourse within socially situated learning experiences. The instructor was able to create a community of learners both within and beyond the boundaries of the physical classroom. Students engaged collaboratively in sophisticated ways, demonstrating that learning can be enhanced when embedded in socially situated experiences.

The authors call for further research examining in-service teachers’ skills and knowledge in relation to technology-integrated instruction to provide additional empirical support for their claim that the TPACK framework must be expanded.

Van Vaerenewyck, L. M., Shinas, V. H., & Steckel, B. (2017). Sarah’s Story: One Teacher’s Enactment of TPACK+ in a History Classroom. Literacy Research and Instruction56(2), 158-175.

Lessons learned from running our first online Design for User Experience course

Today’s post is by Lisa Spitz, Lesley Assistant Professor and consultant for the College of Art and Design’s bachelor’s program in design for user experience.


In Fall 2, 2016 we ran our first course in the Design for User Experience program, Typography 1. 10 students signed up for the course. Excitement ensued. And then I started looking into the class roster. Of the 10 students, just 1 was a Design for UX student. The remaining students represented a mix of Business, Counseling, and Psychology programs. As a new program in an entirely new category for Lesley, I realize that it takes time to market and enroll new students. Nonetheless, I was a bit disappointed by the turn out. I didn’t question the applicability of the content to individuals “outside the field”. Principles of good typography is something anyone can benefit from. But I was worried about the complexity of the learning activities I’d planned and the Adobe software that was required to complete them.

What I learned over the subsequent 8 weeks is the importance of being flexible and the benefit of testing a course with individuals outside your domain. Let’s start with the latter point. For those familiar with Universal Design for Learning or Inclusive Design, it’s a bit like that. If you can make your course “work” for individuals outside your program, chances are it will work better for those inside your program as well. I’m not talking about “dumbing down” content or removing requirements. I’m talking about adding instructional supports to make the course content and expectations clearer. Here are a few ways I made that happen while the course was still in flight:

Providing better prompts
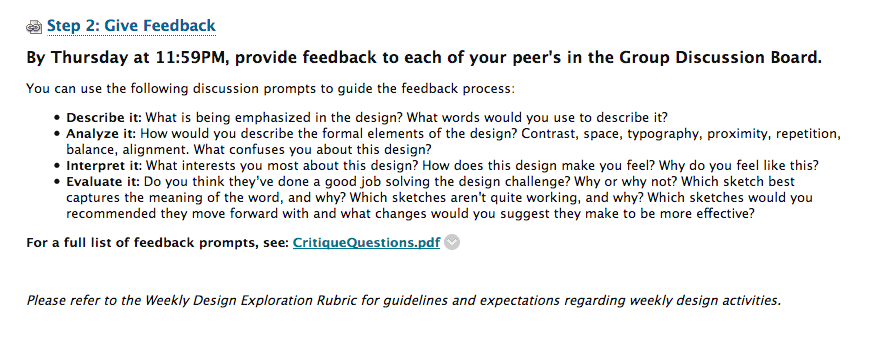
As a typography course, students were expected to create several designs and critique the work of their peers. However, journal entries revealed that students lacked the confidence to do so and some even felt hypocritical critiquing their peers’ work. The original critique questions I’d provided assumed they could judge which design was best (or worst) and give concrete recommendations on what to do next. But students were not sure how to assess the work of their peers. How would they know which was best? They certainly could tell which one they liked, but could not articulate why it was better. So, I went back to the drawing board and made the questions more personal. “What words would you use to describe this?”; “What is being emphasized?”; “What interests you about the design?” Etc. These questions were easier to answer. They required students to respond based on what they saw and how they felt, not what they deemed to be “good” or “bad”.

Original critique language:Critique_Before

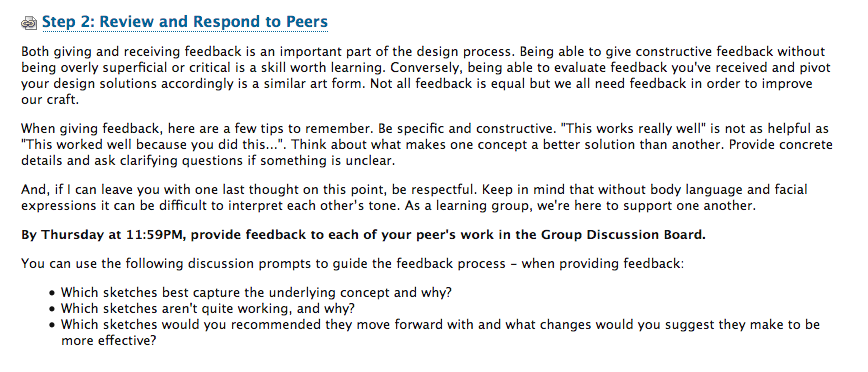
Revised critique language: 
Critique_After


Creating more explicit directions

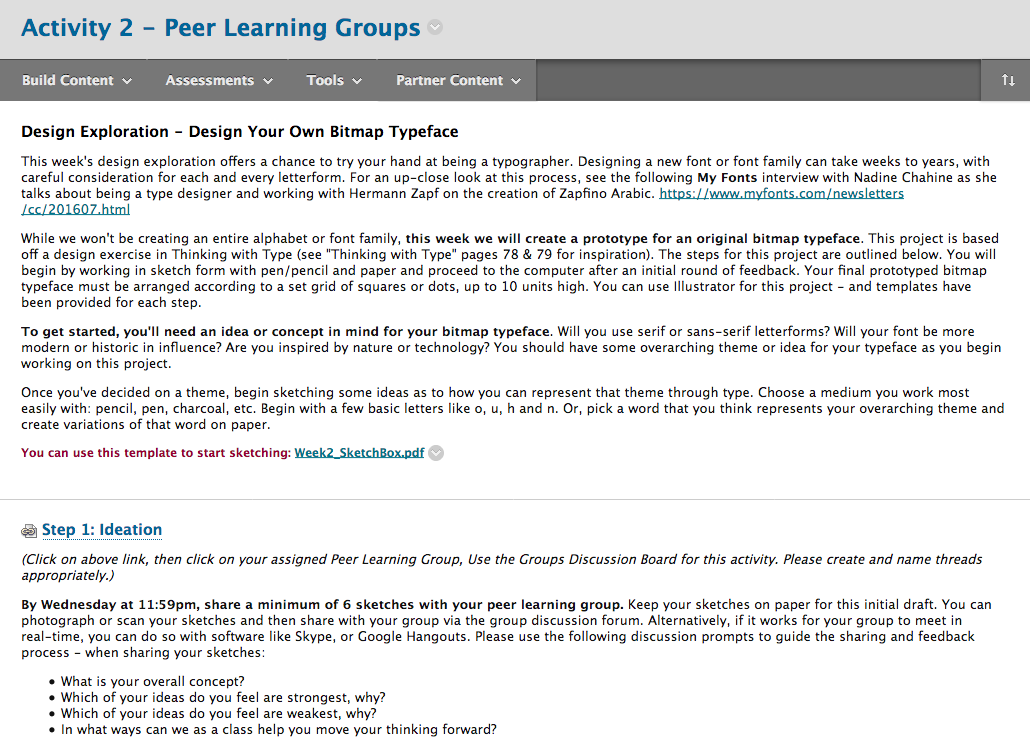
As a visual learner, one of the biggest challenges I faced when creating my own online course is finding ways around the “wall of text”. To explain an activity requires quite a bit of documentation. Aside from using all video or images, there’s almost no way around it. And when confusion arises, the tendency is to double down with more explanation. Instead, I took a step back, added images, cut text, and used more headings and bulleted lists – detailing process, specifications and steps for completion.

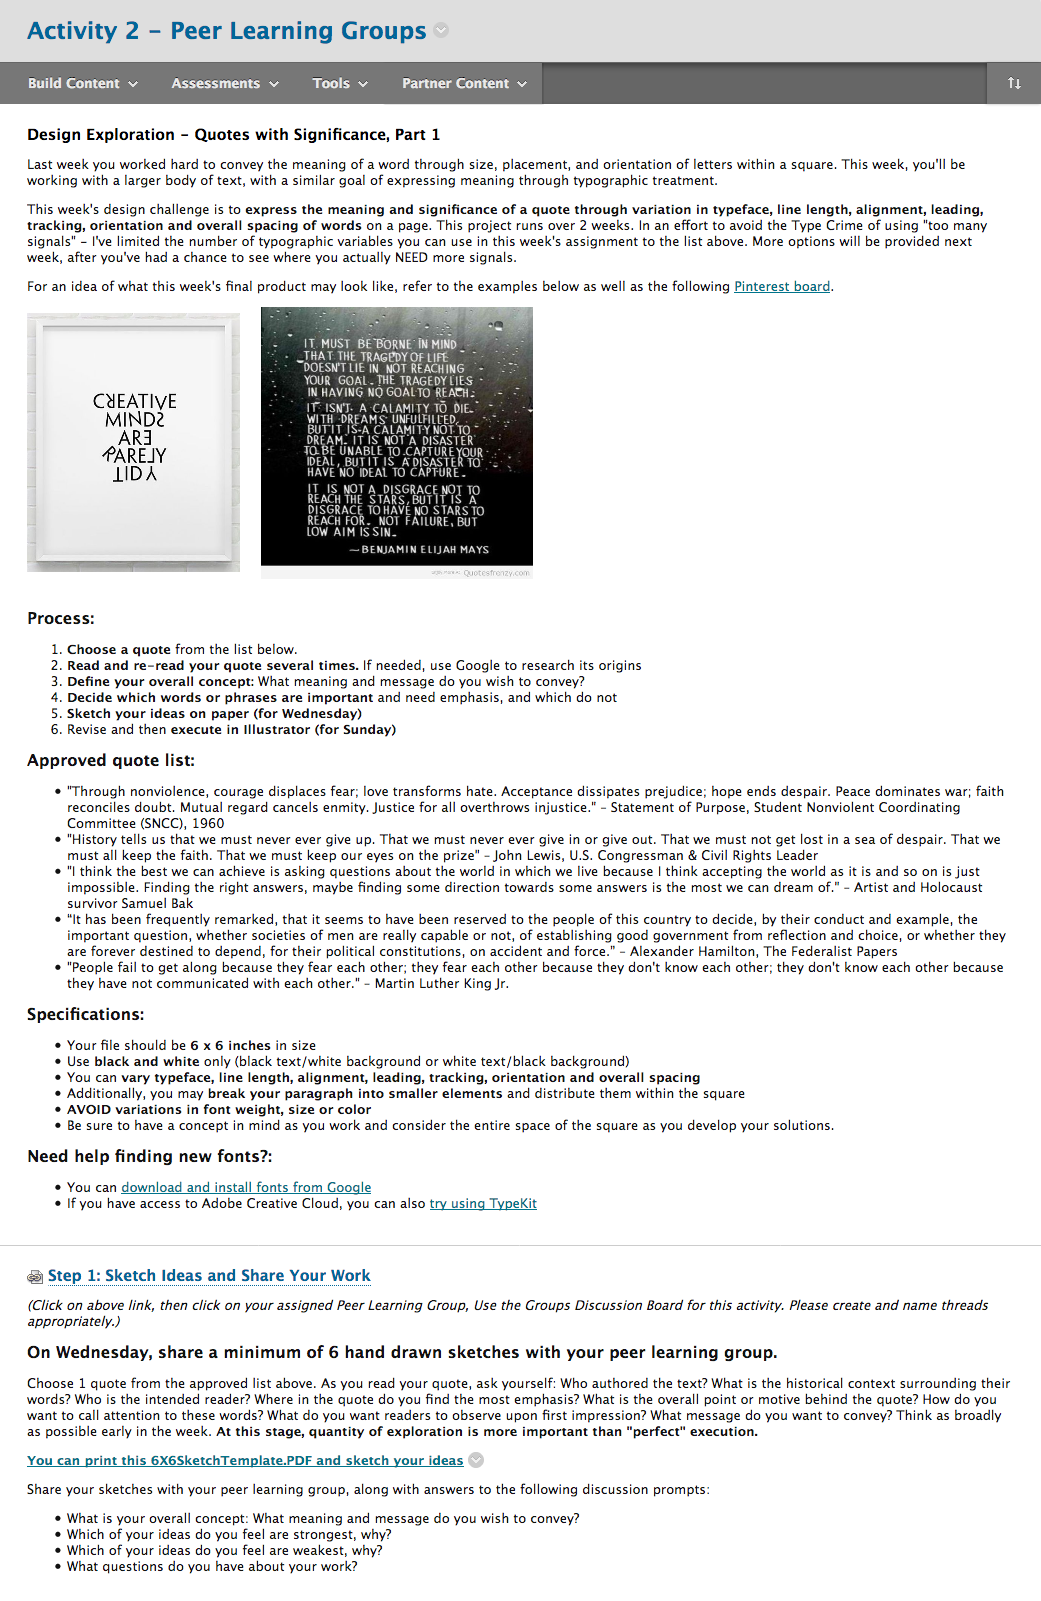
Original assignment description: (click for full size image)
direction_before_crop

Revised assignment description: (click for full size image)
directions_after_crop

Personalizing the feedback process
As students submitted their design work each week, I used the Assignment Tool to provide feedback. Originally, I defaulted to the WYSIWYG editor and took to writing what I thought worked/didn’t work and needed improvement. However, it felt as if some of my feedback was getting lost in translation. Again, the wall of text. Midway through the course I switched to video. Instead of writing a single piece of feedback, I recorded my screen as I looked at each of their design options and spoke about their use of typography in great details. If I’d have typed that feedback out, it would have been a novel. But to record it took just a few minutes. Students appreciated the new format and commented on how incredibly helpful it was.

All of these changes required a great deal of flexibility on my part. I ended up re-writing each week’s content before it went live; I added images to show, not tell; I created videos that demonstrated how to do the assignments; I offered up 30 minute 1:1 time slots to address individual challenges; and I gave feedback that was personal and specific. In the end, I had students comment on their appreciation for typography and design. But more importantly, I witnessed their transformation. When week 1 started, students proclaimed themselves unable to be creative. When week 8 finished, they professed the ways in which they were using their new knowledge of good typography to impact their professional and academic lives. As for myself, I still have some work to do within the course curriculum – but am confident that the results will be even better the next time around.

Threshold Concepts: Helping Students Break through Learning Barriers

breakthrough-1027872_960_720Many, if not all instructors have seen their students struggle to grasp or even fail to understand a concept important to progressing in a course or subject area. This type of learning block can derail a student’s development and have a ripple effect in their studies, particularly if that concept is a building block for future learning. These types of concepts have been identified by researchers in a UK national research project into qualities of strong teaching and learning in the undergraduate disciplines (Enhancing Teaching-Learning Environments in Undergraduate Courses). Erik Meyer and Ray Land, economics professors, found that certain concepts were held by economists that are central to mastering their subject, and that such “threshold concepts” had common features. The acquisition of threshold concepts has been likened to passing through a portal, where learners enter new conceptual territory. New ways of thinking or practicing, previously inaccessible, come into view for learners. Without these concepts, which often afford a transformed view of the subject landscape, students often cannot progress.

Further work over the past decade has examined threshold concepts in a wide range of subject areas, finding that identifying threshold concepts in an instructor’s discipline is a useful first step to tackling “troublesome knowledge”. A group of professors has created a process to increase student learning of threshold concepts called “Decoding the Disciplines”. The process begins with identifying learning bottlenecks making explicit tacit knowledge of experts (like professors) to help students master the mental actions needed for success.

For more information about Threshold Concepts and the Decoding the Disciplines model:
Decoding the Disciplines website
ETL Project (Enhancing Teaching-Learning Environments in Undergraduate Courses)
International Society for the Scholarship of Teaching and Learning
Threshold Concept in Practice (text)

Create a Storyboard

Traditionally a storyboard is a sequence of drawings, often with dialogue or directions, that is used in filmmaking to visualize and organize a scene before it is filmed. Storyboards are very good for media projects where you need to prepare before you begin filming or creating content, but they can be used for lots of other things. You can essentially use a storyboard for anything where you need to move through a process or a collection of content or information.

Storyboards are great for designing a course or even just a learning activity. They allow you to work through a process step-by-step before your students have to do it. By creating a storyboard, you can see the big picture of your course and how everything connects together… or doesn’t. You ensure you haven’t overlooked potential obstacles as well as potential opportunities. Visualizing how all the pieces of a course or assignment work together can help you communicate it to your students making sure they too know how their learning is connected.

The video below walks through creating a journey map for getting a cup of coffee. Sounds simple, right? Even simple things can have many steps. How many did you think weren’t important to mention, but were actually quite critical to the end goal?

Journey Map from Stanford d.school on Vimeo.