Broken Menus After Course Copy?

In this exciting episode, Agent L helps faculty struggling with missing menu items after copying their online course.

Ben Fridayagent LBen Friday: Agent L! Online course instructors are missing menu items after copying their course! It’s a disaster!

Agent L: Ben, take a deep breath. Now, tell me what’s going on.

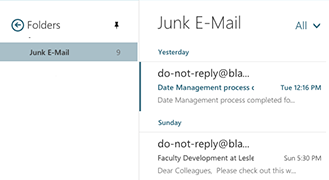
Ben: Okay. So the course menu on the right, is from the original course and the one on the left is from the course after it was copied into a new myLesley course. The Discussion Board, My Grades, Faculty and Technology Resources are all missing. What are we going to do!?!

two menus

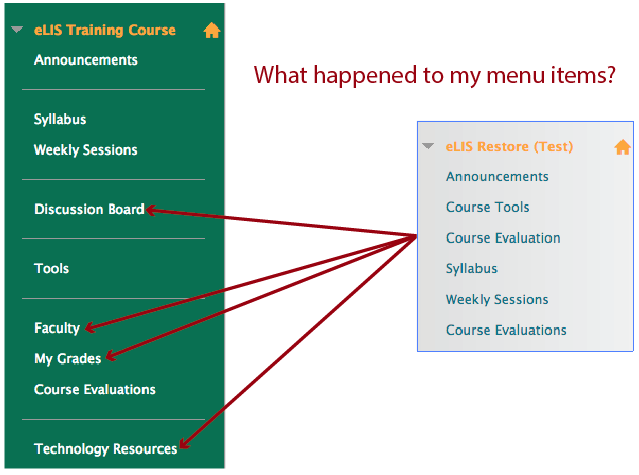
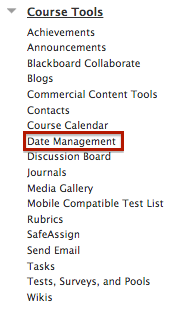
Agent L: Hmmm…. I think I know what is going on. The online instructors copied their content into a blank course site where those menu items didn’t already exist. When they selected the content to copy into their course, they only checked the items they thought they needed such as the content areas and the tools they were using in their course. This seems logical, right?

Ben: Yeah. Why copy stuff you don’t need?

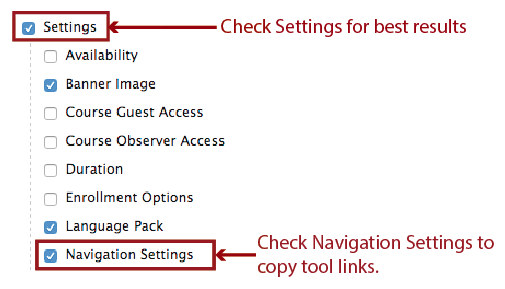
Agent L: Exactly. It makes sense… EXCEPT there are lots of things linked together behind the scenes in a myLesley course. One of those ‘hidden’ items is Settings, especially Navigation Settings. These are links to course tools and other types of content.

The menu items for the Discussion Board and the other missing items are just navigation links to the tool. The Discussion Board is still there. The tool link didn’t simply didn’t copy to the new course because when we left Navigation Settings unchecked we told the system we didn’t want that information.

settings

en: Okay, that makes sense, but what do we do now? Do we have to recopy all the courses?

Agent L: No. It’s an easy fix. We can create new links to the tools. It will only take a minute or two.

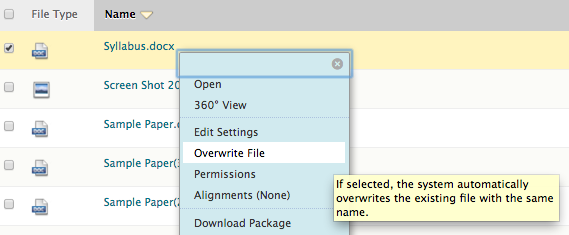
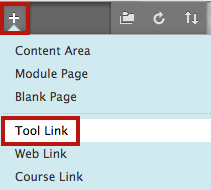
Click on the + sign at the top of your course menu and select Tool Link.
Tool link

Add Tool Link OptionsEnter a Name for the tool you are linking to.
Select the tool from the Type menu.
Check Available to Users so your students can the link and click Submit.

Voila! The missing menu item is back.

Ben: That’s brilliant, Agent L! But are we going to have to recreate those links every time we copy the course?  

Agent L: No, Ben. To prevent the issue, we simply need to be a little less selective when copying our course content.

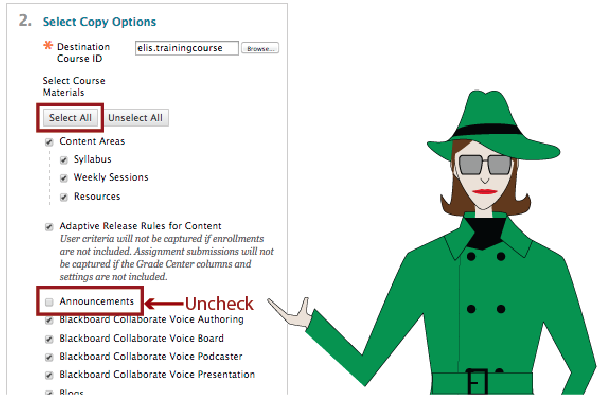
Instead of tediously going through and selecting only the items you think you want to copy, click Select All at the top. Then uncheck anything you know you absolutely don’t want. For most faculty, the only thing you want to uncheck is Announcements. The Announcements tool will still be in the new course, but then you won’t need to delete all those announcements to your students from last semester.

Course Copy Options

Ben: That’s… actually much easier.

Agent L: You’re welcome, Ben.


agent L  Learn more about copying your course and modifying the course menu at the Agent Support Site.  

Emails Blocked from myLesley

Gremlins in the System (GITS) is at it again. This time they are blocking communications sent from myLesley in hopes of disrupting eLearning. Will Agent L be able to outsmart them? Read on and find out.

ALvsGITS

Agent L: Hi Ben. Do you have time for a cup of coffee?

Ben Friday: Not today, Agent L. GITS are at it again. They are blocking emails sent from myLesley. No one is getting their messages. It’s a disaster!

Agent L: Calm down, Ben. Tell me what’s happening.

Ben: GITS has changed the email address that all the myLesley course emails are sent from. They are now coming from do-not-reply@blackboard.com except not everyone is getting them.

Agent L: Let’s take a look at your email. It must be there somewhere. Here they are. All the emails are in your Junk Email folder. Basically your email application thinks the emails are spam.
junk email folder

Ben: So what do I do?

Agent L: Simple. We tell Office 365 that they emails are ok.
(Agent tip: Go to lesley.edu/email to access Office 365 with your Lesley email address and password.)

From within Office 365, click on the gear icon in the top right corner. Settingsicon

Choose Options from the menu. Then click Block or allow in the left-hand menu.
blockAllow

Click on do-not-reply@blackboard.com to select it and click the trash can icon to remove it from the list.
Blockedsenders

Click Save at the top to save your options and you’re all set. Emails from myLesley will now go to your Inbox instead of your Junk Email folder.

BenBen: Wow, Agent L! Way to outsmart GITS!

agent LAgent L: Outsmarting GITS isn’t just my mission, Ben. It’s my passion.


Learn more about using myLesley and Office 365 at the Agent Support Site.

Updating Dates in myLesley

In today’s episode, Agent L once again saves the day … and Ben Friday’s sanity. Read on and learn how to update all the due dates in your myLesley course.

agent LAgent L: Hi, Ben. What’s going on? I thought we got all the syllabi updated.

BenBen Friday: We did, Agent L, but now we need to update all the assignment due dates. The new semester is starting in a few days and all the dates are for last semester. We have to go to each assignment and fix the due date.

Agent L: Oh, Ben. You do know you can update ALL the dates in one place, right?

Ben: What?!? How? Where?

Agent L: It’s called the Date Management tool and you can find it in the Control Panel. It’s part of the Course Tools section.
agentLhalffig_left
date management

You have three options for updating the dates.
date management options

You can use the course start date to adjust all the dates in the course based on the date your course starts. For example, if your original course started on January 1st and you had a paper due on January 10th, that’s 9 days after your course start date. If your new course starts on February 29th, entering your course start date will adjust the paper’s due date to March 9th or 9 days after the new course start date.

You can also select to adjust by number of days. This will shift all the dates by the number of days you enter. If you enter 30 days, then your all your course dates will shift by that many days. The paper due on January 10th, will now be due on February 9th. This one might require a little math, but is a good option if know the exact number of days you need to shift dates.

The third option is to list all dates for review. This option will display all the existing dates in your course and allow you to adjust them manually. This is a good option if you already have all the dates in your syllabus or made some adjustments in your course assignments. You will still need to adjust each date manually, but you can do it all in one place rather than navigating to each dated item in the course.

Ben: That’s brilliant, Agent L! This is going to save us soooo much time. I’ll let everyone know. See you later.

Agent L: Ummm… Ben? What about that coffee? … Maybe next time.

To learn more about the Date Management tool watch the video tutorial below or view Blackboard’s help page. For more myLesley tutorials, visit the Agent Support Site.

Updating Your Syllabus in myLesley

In this episode, Agent L helps faculty easily update their syllabus AND all the links to it their myLesley course.

BenBen Friday: Hi, Agent L. No time to talk now. We will have to grab coffee some other time. Must run.

Agent L: Ben, what happened? Why is everyone so busy?

Ben: A new semester started and faculty have uploaded their updated syllabi to their myLesley courses.

Agent L: That’s great! They are sharing their syllabi digitally instead of on paper. … Isn’t it…?

Ben: Yes, but they’ve linked to the syllabus from multiple places in their online course site. All of those links need to be updated with the new file. It’s a lot of work to go through your course to find and update them all.

Agent L: Ummmm…. Ben…. there’s a much easier way to do this.

Ben: What? How?

Agent L: We can overwrite the old syllabus file with the new one in Course Files. All the links to that file will be updated to the new file in one step. Here, let me show you.

Log into the course you need to update. Then go to the Course Management area in the left-hand menu.

CourseFiles  agent L

Click on Content Collection and then the Course ID for your course. It’s elis_training_2014 for this course. This will open up the Course Files area of your course. It contains every file (documents, images, videos) uploaded to your course.

Locate the syllabus file in the list. Now click on the gray arrow at the end of the file name. Select Overwrite File from the menu that opens.

overwrite file

Click Choose File and locate the updated syllabus document on your computer.

choose file

WAIT! THIS STEP IS IMPORTANT!
The new syllabus MUST have the same file name as the old syllabus. The contents of the document can change, but you will need to save the new syllabus with the same name as the old one.

YES NO
old file name Syllabus_English101.docx Syllabus_Fall2015.docx
new file name Syllabus_English101.docx Syllabus_Spring2016.docx

Once you have selected your updated syllabus file, click Submit.

That’s it. All the links to the syllabus will now download the new one.

Ben: You mean we don’t need to tediously go through the entire course and change all the links. We only need to replace the file.

Agent L: Yep. As long as the new syllabus has the same file name, it will work perfectly. It also works with reading lists, study guides, rubrics, images… any file really.

Ben: Wow! That’s great! Maybe I have time for coffee after all.


agent LTo learn more about how to best take advantage of your Course Files, see Blackboard’s Best Practices on Attaching Files. For more myLesley tutorials, visit the Agent Support Site.

Fixing Broken Wiki Links

In this week’s Agent L episode, Gremlins in the System (GITS) try to undermine student collaboration by breaking links to wikis in myLesley courses. It’s Agent L to the rescue.

BenBen Friday: Agent L, it’s a disaster. GITS agent, NeoLuddite, has broken all the links to course wikis in myLesley. Look…

Error: Broken Course Link: Item does not exist in the system. The specified object was not found.

Agent L: What does he hope to accomplish?

Ben: NeoLuddite thinks technology is going to ruin education. By corrupting links to the wikis,  he hopes to stop students from collaborating online. We can’t let him win.

neoluddite_sq

Agent L: Letting NeoLuddite win is not an option. The wiki links can be fixed.

Ben: How?

Agent L: It’s easy, Ben. We simply delete the old link to the wiki and create a new one.

Ben: But won’t that delete the wiki?!?agent L

Agent L:
Not at all. The wiki is still there with all the students’ work. We just need to
recreate the link to allow them to find it again.

Ben: How do we do that?

Agent L: Simple. Let’s go into a course and I’ll show you.

First, let’s delete the bad link. Click on the small gray arrow at the end of the wiki title and select Delete from the menu.

course wiki link     deletelink

Remember, this is only deleting the link, not the wiki.

Now, we can recreate the link. go to the Tools menu and select Wikis.

Tools menu

Select Link to Wiki to choose to create a link to an existing wiki and select the name of the wiki from the list. Then click Next.

select wiki link

Add a description or instructions for you students and click Submit. That’s all there is to it.

Ben: It’s working. I can access the wiki and see everyone’s contributions. It’s all there.

Agent L: Of course. NeoLuddite can’t get the best of us. We have technology at our disposal.


agent LSee the complete instructions at the Agent Support Site.