March Faculty Community Conversation: Student Presentations

We’re all familiar with the traditional end-of-semester final presentation where each students speaks to the class for a period of time, often while sharing Powerpoint slide. But what if it could be different? This March Ingrid Stobbe, Assistant Professor of Digital Filmmaking, and Jason Butler, Associate Professor of Drama Therapy, led our Community Conversation on alternative ways to do student presentations or as Jason put it, how we can “play and innovate with our students.” 

Ingrid teaches film production and theory classes at Lesley and one of her students proposed an alternative. He wanted to create a short film as his presentation. As with any other presentation or final paper, he started with his thesis statement: Pink Floyd’s “Live at Pompeii” was an innovative documentary that merged the medium of music with innovative techniques that were starting to appear in documentary filmmaking of the time. He then provided Ingrid with an outline where his thesis statement would be supported by media clips. Ingrid liked the idea enough to open the option up to all the students in the class. They still needed to hit the objectives of the assignment, synthesize what they had learned in class, and communicate that information to others, but it allowed filmmaking students a chance to express themselves in their own medium. For Ingrid, the question at the end of the day was “Is there a way that I can support and allow for the key moments in my class?” 

Ingrid’s alternative presentations were the result of a student request. However, Jason purposely designed his into his Drama Therapy course. Jason based his approach on Universal Design for Learning theories (UDL) where multiple avenues are provided for students to engage with the content and to share their knowledge. 

Jason had both asynchronous and synchronous elements to his course assignments. Students began by creating a fictional story and character to learn about embodiment. They then created short videos of themselves showing how their character is embodied. In the follow up assignment, students compared autobiographical theater with self-love pieces. Many students created traditional Powerpoints, but others did a more creative interpretation which was then shared in VoiceThread. VoiceThread allows the presenters to have traditional slides, images, and video. Viewers can provide feedback in multiple ways, text, audio, or video, allowing them some choice in how they respond.    

Jason also had some tips for synchronous presentations. He hides non-video attendees in Zoom and then asks the students who aren’t presenting to turn off their camera in order to create a stage for the performers on screen. Other times, he asks students to move closer to the camera if they agree with what is being said and to move away if they disagree in order to get the audience involved and interacting rather than just sitting back and watching. He also uses the reaction buttons in Zoom or asks the viewers to enter a word or two in the chat that expresses their thoughts on the presentation.   

But how do you assess such innovative assignments?  

According to Ingrid and Jason, you must give it structure. Jason shares the criteria of what needs to be covered while Ingrid has a workshop day where the student comes in with an outline of the goals they need to meet and how they will do that. While you are providing the student with some flexibility and room to explore, it must still meet the assignment criteria and stay within the boundaries of what the instructor can grade. Having a rubric helps communicate the criteria and to grade.  

How do you provide options when you teach more traditional content?  

Look for places where you can provide a little bit of choice for students. Where can you provide a small piece of creativity for them. Your students might not be ready to dance their dissertation, but can they share a picture or a piece of music that will transmit another aspect of the article they presenting on? The process forces us to think in different ways. 

One significant goal is to create a classroom culture where students feel empowered and comfortable talking risks and stepping out of their comfort zone. Small gestures over time where you allow students choice or opportunities to be themselves helps to create that safe space. Jason shared that in partnership with UDL, there’s a trauma-informed pedagogy perspective that says when we are activated due to trauma, we can’t function or reason… or learn. One of the common reasons for trauma is a lack of choice. It’s difficult to properly engage with something when we feel that it is being imposed on us. Providing some form of choice in your assignments diminishes that activation and allows students to more fully participate. 

Do you provide alternative ways for students to share their knowledge? Let us know how. 


Community Conversations: Peer Feedback

February’s Community Conversation focused on Peer Feedback, led by CLAS and LA+D faculty Kim Lowe, Summer Clark, Lisa Spitz, and Bill Porter. They are members of a longstanding research group that looks at ways to implement and improve peer review and critique and to “create a better learning experience.”  

Kim Lowe kicked off the conversation by explaining how she had hated peer review as a student and had vowed, “when I became a professor, I would never do it.” However, she saw the learning benefits and found the peer review protocol the group created highly effective for her students.  

Creating the Peer Review Protocol

In 2016, the interdisciplinary group began to study peer review by researching best practices for conducting peer feedback assignments, the benefits of peer feedback, and how to address challenges. The benefits of peer review include self-reflection, self-regulation, critical thinking, and communication skills that transfer not only to other classes, but to students’ professional careers. It enhances empathy and students’ ability to navigate social and emotional interactions in the classroom while exposing them to perspectives and opinions other than those of their instructor.  

Peer review also requires students to participate at a higher level of engagement. They must spend time and energy to provide constructive feedback that the other student can utilizeHowever, students may not trust the feedback they receive from other students and may not be sure if they should apply it or not. Students may even doubt their own ability to provide feedback.  

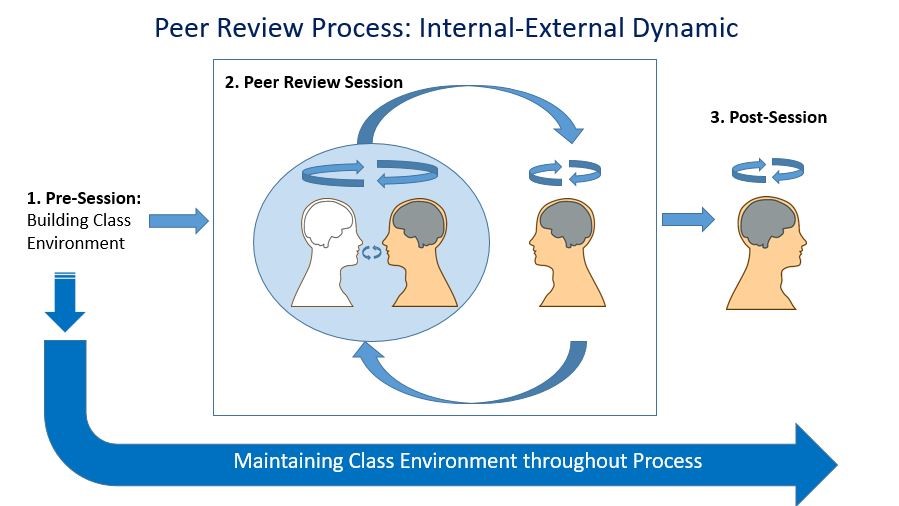
Due to these challenges, the first stage of the peer review protocol the group developed is to prepare students to do peer review. In this stage, the instructor builds trust in the process by discussing the strengths of peer review and, perhaps even more importantly, the reasons why they may be skeptical. Faculty should also discuss how peer review will be used within the class and model what effective peer review looks like. It’s also important to assess the feedback given, not just the assignment being reviewed.  

The second stage, the peer review session, is a scaffolded dialogue where students submit their assignment, identifying the areas where they most want feedback. Other students then provide feedback using a rubric or by answering a series of questions to guide their feedback. Students then review the feedback they received, rewriting it in their words to encourage processing, and determine how or if they will apply it.  

In the final stage, students revise their assignment. They also submit a summary noting how they implemented the feedback they received and the reasons why they made those choices. The instructor then assesses both the assignment and the student feedback.  

Internal-External Dynamic of Peer Review process

Q&A

One question asked of the group was if peer review was spreading beyond art and literature courses. Summer Clark spoke about using peer review to help her education students create better lesson plans and believes that it can be used across disciplinesThe group encourages faculty to co-create criteria for reviewing work in order to create consensus and understanding around what qualities embody good work, regardless whether that work is a drawing, essay, presentation, or business analysis.  

However, that was just the beginning of the discussion, which included brainstorming strategies with the other attendees. Watch the recording to hear more and join our Faculty Community Conversation Team to continue chatting 

Set Up Your Grade Center in myLesley

Setting up the myLesley Grade Center is not always the most intuitive thing. However, with a little bit of thought, it doesn’t have to be difficult.

Step 1: Create Your Plan

The first mistake most people make is they start in the Grade Center. Going into the Grade Center is usually the last step. If you try to set it up piecemeal, you will inevitably miss a step or forget what you entered somewhere and then before you know it, you’re lost.

The first step is to grab you syllabus, list out your assignments and grading scale, and make a plan. Watch the video below to see an example.


Step 2: Create Your Content & Assignments

The next step is to create my content in Blackboard, assuming I haven’t already done this. I’ve already created most of my content, but I still need to create the Final Project assignment. This video from Blackboard shows me exactly how to create an Assignment so my students can submit their work and I can grade and provide feedback.

Need to create graded discussions? Review how to create discussion forums on our support page.


Step 3: Create Grade Columns

Now that I have created all of my content and assignments, I can finally go to the Grade Center and finish setting things up.


Step 4: Calculated Grade Columns

Decisions, decisions… Total column or Weighted Total?

See our support article on Calculated Grade Columns for step-by-step instructions.


Step 5: Organize Your Grade Columns

All the grade columns are set up and ready to go, but Blackboard has them organized based on the order they were created. This might not be the ideal set up for you. So change it.

View Blackboard’s video tutorial on customizing your Grade Center view for more information.


Additional Resources

Your grade center is now set up and ready to go, but there’s always more to know and more scenarios for set up. Check out these resources below or email elis@lesley.edu for assistance.

myLesley Grade Center and Grading
Advanced myLesley Grade Center and Grading

Grading myLesley Assignments
myLesley Rubrics
myLesley Faculty Resources


Merging Your Content with the New Course Menu

A new course menu and template were created for this Fall. The purpose was to create more consistency for students across all their courses and to embed supports where possible. However, if you are copying content from a previous course in myLesley to your Fall 2020 course, you may need to merge the two and clean things up a bit.

What’s in a course menu?

There are three main types of course menu items: content areas, tool links, and web links.

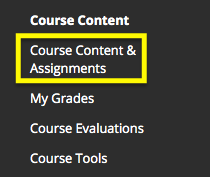
Course Content & Assignments is a content areaContent Areas are places in your course where you post various types of course content, such as items, uploaded documents, assignments, and more. Think of them as a folder on your computer where you group common items together. Course Content & Assignments is an example of a content area.


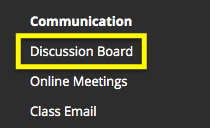
Tool Links are links to tools that are part of Blackboard or integrated into Blackboard, such as Discussions Boards, Class Email, My Grades, etc.


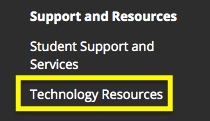
Technology Resources is a web linkWeb Links are links to external content. This external content can be anything on the internet that you wish to link to. For example, Technology Resources links out to the IT & eLearning Support Site at Lesley.


Course content and Communication are headers in course menuThe new course menu also contains Headers. These are non-clickable titles for groups of related content. They can be renamed, edited or moved just as any other menu item. “Course Content” and “Communication” are examples of a header.

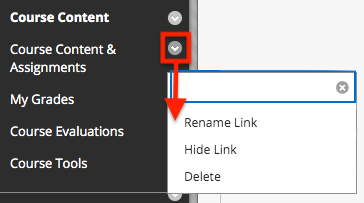
Your course menu is completely editable by you. Course menu items can be renamed, moved, deleted, and hidden from student view.

Modify menu

A Common Issue After Course Copy

If you copy your course content from a prior course you may notice that you have menu items for “Course Content” and for “Course Content & Assignments.” myLesley (Blackboard) will not merge these two content areas together automatically. Just as with folders you create on your computer, these are two separate containers with different names. You need to tell Blackboard what you want it to do.

Fix your course menu in 3 easy steps

1. Rename menu items

Many faculty choose to rename the older “Course Content” menu item to “Course Content & Assignments.”

For more information see Modifying your Course Menu.

2. Delete menu items

Delete the original (now duplicate) placeholder content.

Be very sure to delete. There is no undo.

Also, delete any duplicate or unneeded menu items that copied to clean up your course menu and make it easier for your students to navigate your course menu.

3. Reorder menu items

When a course copy is done, all new content copied in is at the bottom of the menu. You can easily reorder the menu items, but clicking on the double arrow icon to the left of the menu item and dragging it to a new location.
move icon


For more information see Modifying your Course Menu.